NSPanel-Easy
Migrating to NSPanel Easy
Welcome! 👋 If you’re coming from Blackymas/NSPanel_HA_Blueprint, you’ll feel right at home here. NSPanel Easy is derived from that project and keeps the same familiar structure, so migrating is quick and straightforward - just a few small changes and you’re done.
[!TIP] The whole process typically takes less than 10 minutes per panel. No need to open your panel, no re-flashing via serial, and your automations keep working.
[!NOTE] New to NSPanel customization? This guide is specifically for users migrating from Blackymas/NSPanel_HA_Blueprint. If you’re setting up a panel for the first time, head over to the Getting Started Guide instead - it will walk you through everything from scratch.
Before You Start
Make sure you have:
- Your NSPanel already running with Blackymas/NSPanel_HA_Blueprint
- Access to your Home Assistant instance
- Access to the ESPHome Dashboard (Add-on or standalone)
[!NOTE] Your panel’s Wi-Fi settings, device name, and substitutions stay the same. You’re only changing where ESPHome pulls its packages from.
Step 1 - Update Your ESPHome Configuration
This is the main change. Open your panel’s YAML file in the ESPHome Dashboard and update the
packages section to point to the new repository.
What to change
OTA settings
On the new version we broke the connection between OTA and WiFi passwords, so you can easily change any of those. However, this change requires some new manual configuration when migrating.
Find your substitutions block and add the substitution ota_password: ${wifi_password},
as that is how OTA password was defined on Blackymas project, but not here.
It will look something like this:
substitutions:
  # Settings - Editable values
  device_name: "YOUR_NSPANEL_NAME"
  friendly_name: "Your panel's friendly name"
  wifi_ssid: !secret wifi_ssid
  wifi_password: !secret wifi_password
  ota_password: ${wifi_password}  # IMPORTANT! For backward compatibility
  language: en                    # Language code - see docs/localization.md for all supported codes
[!NOTE] Setting OTA to use WiFi is only necessary if you are migrating wirelessly. When migrating via USB/TTL you can freely select your OTA password or leave without one.
Language
Language is no longer selected in the Blueprint. You must now set it as a substitution
in your ESPHome YAML. Find your substitutions block and add:
substitutions:
  language: en  # Replace with your language code
For the full list of supported language codes, see Localization.
[!IMPORTANT] If you skip this step your panel will fall back to English after migration, regardless of what language you had selected in the old Blueprint.
nextion_update_url
If you had nextion_update_url defined in your substitutions, read this carefully
before updating.
In the Blackymas project, nextion_update_url was the primary way to specify the TFT
file source, and a dedicated selector option (“Use nextion_update_url”) was required
to activate it. In NSPanel Easy, this substitution now acts as a full override.
When set, it bypasses the model selector and version logic entirely, and the specified
URL is used as-is for every upload.
If you defined nextion_update_url only to select your panel model, remove it from
your substitutions. The Display model selector in Home Assistant now handles model
selection automatically, including building the correct versioned download URL.
If you defined nextion_update_url to host a custom or local TFT file, you can
keep it, but be aware that automatic version management is disabled and you are responsible
for keeping the URL pointing to a compatible and up-to-date TFT file.
For full details on the new TFT upload behavior and available substitutions, see the TFT Upload Add-on documentation.
Remote package reference
Find your remote_package block. It currently looks something like this:
packages:
  remote_package:
    url: https://github.com/Blackymas/NSPanel_HA_Blueprint
    ref: main  # or whatever version you were using
    refresh: 300s
    files:
      - nspanel_esphome.yaml # Base package
      # Add-ons you may have enabled:
      # - nspanel_esphome_addon_climate_heat.yaml
      # - nspanel_esphome_addon_climate_cool.yaml
      # - nspanel_esphome_addon_climate_dual.yaml
      # - nspanel_esphome_addon_cover.yaml
Change it to:
packages:
  remote_package:
    url: https://github.com/edwardtfn/NSPanel-Easy
    ref: latest
    refresh: 300s
    files:
      - nspanel_esphome.yaml # Base package
      # Add-ons you may have enabled:
      # - esphome/nspanel_esphome_addon_climate_heat.yaml
      # - esphome/nspanel_esphome_addon_climate_cool.yaml
      # - esphome/nspanel_esphome_addon_climate_dual.yaml
      # - esphome/nspanel_esphome_addon_cover.yaml
Summary of changes
| Setting | Before (Blackymas) | After (NSPanel Easy) |
|---|---|---|
ota_password |
It was set on the remote package to use your WiFi password | You have to add the substitution ota_password: ${wifi_password} for backward compatibility |
language |
Selected via Blueprint dropdown | Set as language: xx substitution in ESPHome YAML - see Localization |
nextion_update_url |
Used to select the TFT model or override the URL | Now a full override only. Remove it unless you are hosting a custom TFT file locally |
upload_tft / wake_up API actions |
Registered by default | Opt-in — add include_action_upload_tft: true and/or include_action_wake_up: true to your substitutions if needed |
url |
https://github.com/Blackymas/NSPanel_HA_Blueprint |
https://github.com/edwardtfn/NSPanel-Easy |
ref |
main (or a specific version) |
latest |
| Add-on file paths | Root level (e.g. nspanel_esphome_addon_climate_heat.yaml) |
Inside esphome/ folder (e.g. esphome/nspanel_esphome_addon_climate_heat.yaml) |
| Base package | nspanel_esphome.yaml |
nspanel_esphome.yaml (no change) |
[!IMPORTANT] The base package (
nspanel_esphome.yaml) stays at the root level - no path change needed. Only the add-on files moved into theesphome/subfolder.
Example: Complete configuration after migration
Here’s a typical panel configuration after migrating, using the climate dual add-on as an example:
substitutions:
  device_name: "my-nspanel"
  friendly_name: "My NSPanel"
  wifi_ssid: !secret wifi_ssid
  wifi_password: !secret wifi_password
  ota_password: ${wifi_password}  # IMPORTANT! For backward compatibility
  language: en                    # Language code - see docs/localization.md for all supported codes

  # Add-on configuration (if needed)
  ## Upload TFT
  upload_tft_automatically: true
  ## Climate add-on
  heater_relay: "1"  # Possible values: "1" or "2"
  cooler_relay: "2"  # Possible values: "1" or "2"

# Customization area
##### My customization - Start #####
##### My customization - End #####

# Packages
packages:
  remote_package:
    url: https://github.com/edwardtfn/NSPanel-Easy
    ref: latest
    refresh: 300s
    files:
      - nspanel_esphome.yaml # Base package
      - esphome/nspanel_esphome_addon_climate_dual.yaml
CJK language support
CJK (Chinese, Japanese, Korean) language support is now built into the standard TFT files. There are no separate CJK variants. Simply select the model matching your hardware (NSPanel EU, NSPanel US, or NSPanel US Landscape) regardless of the language you use.
Step 2 - Flash the Updated Firmware
Once you’ve saved the YAML changes:
- In the ESPHome Dashboard, find your panel and click the three-dot menu.
- Select Install → Wirelessly.
- Wait for the compilation and upload to complete.
Your panel will reboot with the new firmware. This is a standard OTA update - no need to open the panel or use a serial adapter.
[!TIP] If you have multiple panels, repeat Steps 1 and 2 for each one.
Step 3 - Update the Blueprint
Now let’s switch your automations to use the new Blueprint. The good news is you don’t need to reconfigure anything, we’ll just import the new Blueprint and point your existing automations to it.
3a. Import the new Blueprint
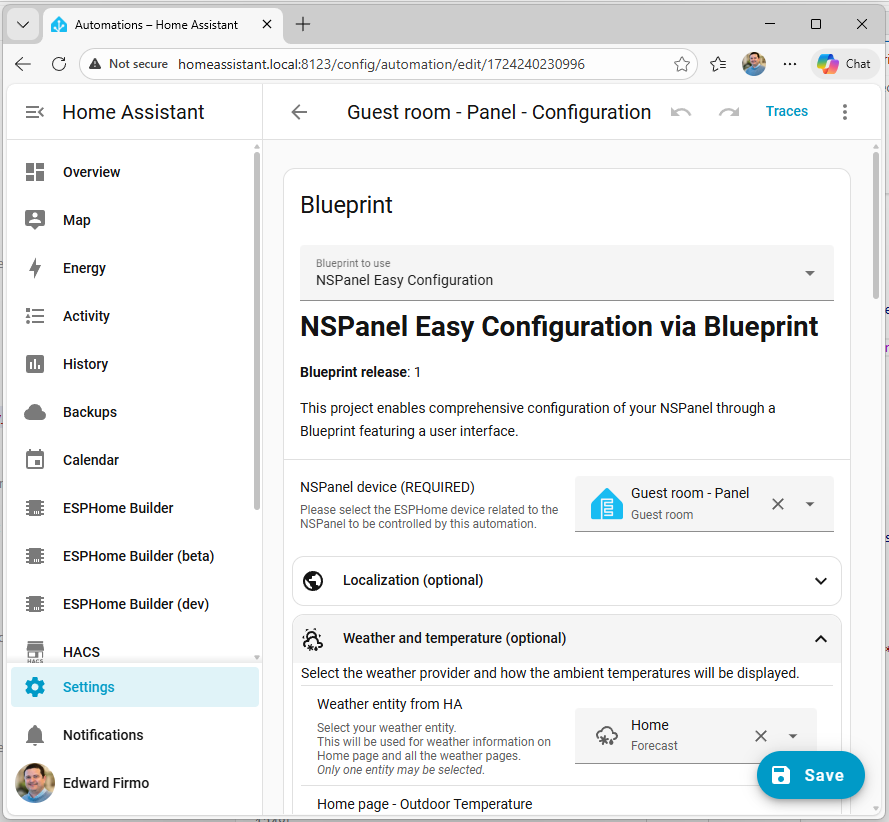
First, import the NSPanel Easy Blueprint into Home Assistant. Click the button below to do it directly:

Alternatively, you can import it manually:
- Go to Settings → Automations & Scenes → Blueprints.
- Click the Import Blueprint button (bottom-right corner).
-
Paste this URL:
https://raw.githubusercontent.com/edwardtfn/NSPanel-Easy/refs/tags/latest/nspanel_easy_blueprint.yaml - Click Preview Blueprint and then Import Blueprint.
At this point you’ll have both the old and new Blueprints listed - that’s perfectly fine.
3b. Switch your automations to the new Blueprint
This is where the magic happens - we’ll edit the automation’s YAML directly so all your existing settings (entities, buttons, language, weather, etc.) are preserved as-is.
- Go to Settings → Automations & Scenes.
- Find your NSPanel automation in the list and click on it to open it.
-
Click the three-dot menu (⋮) in the top-right corner and select Edit in YAML.
-
At the top of the YAML, find the
use_blueprintsection. It will look something like this:use_blueprint: path: Blackymas/nspanel_blueprint.yaml input: # ... all your settings here ... -
Change only the
pathline to point to the new Blueprint:use_blueprint: path: edwardtfn/nspanel_easy_blueprint.yaml input: # ... all your settings remain exactly the same ... - Click Save.
[!IMPORTANT] Do not change anything in the
input:section - that’s where all your panel settings live. By only changing thepath, your entire configuration carries over to the new Blueprint.
[!TIP] If you have multiple panels, repeat this process for each panel’s automation.
[!IMPORTANT] After the OTA reboot, the ESPHome logs may show repeated warnings such as
[W][nextion:xxx]: Not connectedfor a couple of minutes. This is expected: the new firmware negotiates the UART baud rate with the Nextion display on first boot, and the previous firmware likely used a different rate.Once negotiation completes, the firmware will detect the TFT version mismatch and start the upload automatically (unless you’ve disabled auto-upload). The TFT transfer takes 10–20 minutes — you can follow progress in the logs or on the panel itself.
If after several minutes nothing has started, restart the panel by cutting and restoring power. If the issue persists, see the TFT Transfer Troubleshooting Guide.

3c. Verify your automations
After saving, switch back to the visual editor to confirm everything looks right:
- Click the three-dot menu (⋮) again and select Edit in visual editor.
- Review that your settings (device, entities, weather, language, etc.) are still in place.
- The automation should now show the new Blueprint name.
3d. Remove the old Blueprint
Once all your automations are working with the new Blueprint, you can clean up:
- Go to Settings → Automations & Scenes → Blueprints.
- Find the old Blueprint from Blackymas.
- Check the In use column - it should show 0, meaning no automations are still using it. If it shows a number other than 0, go back to Step 3b and migrate those automations first.
- Click the three-dot menu next to it and select Delete blueprint.
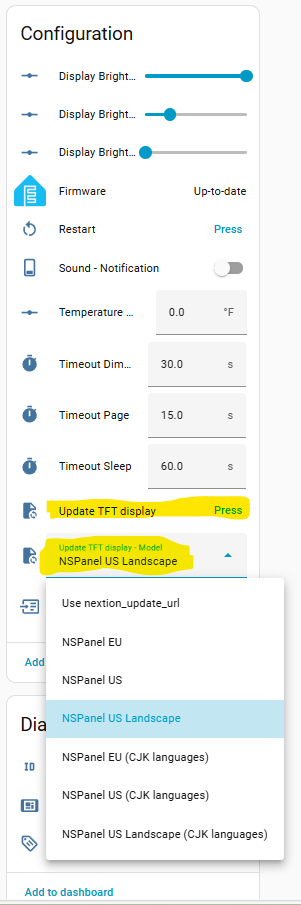
Step 4 - Update the TFT Display
The display file (TFT) needs to be updated to match the new firmware:
- In Home Assistant, go to your panel’s device page (under Settings → Devices & services → ESPHome → your panel).
- Select the correct Display Model for your panel (EU, US, or US Landscape).
- Press the Update TFT display button.
- Wait for the transfer to complete (usually 10–20 minutes).
[!TIP] If the transfer doesn’t start right away, don’t worry - ESPHome will retry automatically with different parameters. Give it up to a minute to begin.
That’s It! 🎉
Your panel is now running on NSPanel Easy. Everything should look and work just like before, and you’ll now receive updates from the new repository.
What’s next?
- Check for new features in the NSPanel Easy documentation.
- Review the Blueprint settings for any new options available with NSPanel Easy.
- Join the community on Discord if you need help or want to share your setup.
- Report issues or request features on GitHub.
Troubleshooting
The firmware won’t compile after changing the URL
Double-check that:
- The
urlis exactlyhttps://github.com/edwardtfn/NSPanel-Easy - The
refislatest(not a version tag from the old repository). After this first migration install, you’ll be able to use version tags in the same format (e.g.ref: v5.0.0) once NSPanel Easy publishes releases. - Add-on files use the
esphome/prefix (e.g.esphome/nspanel_esphome_addon_climate_heat.yaml) - The base package
nspanel_esphome.yamldoes not have theesphome/prefix
My automation shows an error after changing the Blueprint path
Make sure the path value matches exactly what Home Assistant assigned to the imported Blueprint.
You can verify the correct path by creating a temporary test automation from the new Blueprint:
- Go to Blueprints, click the new NSPanel Easy Blueprint, and create a dummy automation.
- Switch to Edit in YAML and note the
pathvalue. - Use that exact path in your real automation(s).
- Delete the test automation.
The TFT transfer fails
Consult the TFT Transfer Troubleshooting Guide for detailed help. The most common fix is to ensure your panel has enough free memory for the transfer.
My panel is offline after the update
Try restarting the panel by cutting and restoring power. If it still doesn’t come online, check the ESPHome logs for compilation or connectivity errors.
FAQ
Q: Will I lose my settings?
A: No. Your substitutions, Wi-Fi credentials, and automation settings are preserved.
Q: Do I need to re-flash via serial (USB-to-TTL)? A: No. The migration is done entirely over Wi-Fi (OTA update).
Q: Can I go back to Blackymas if needed? A: Yes. Simply reverse the URL and ref changes in your YAML, re-flash, and switch your automation’s Blueprint path back to the old one.
Q: Do I need to update all my panels at once? A: No. You can migrate one panel at a time. Each panel is independent.
Q: My panel is now showing English instead of my language after migration.
A: Language is no longer configured in the Blueprint. Add language: xx to your
ESPHome substitutions block and reflash. See Localization for supported codes.
Q: I had nextion_update_url defined. Do I need to keep it?
A: Only if you are hosting a custom or local TFT file. If you set it to select your panel
model in the Blackymas project, remove it. Model selection is now handled automatically
by the Display model selector in Home Assistant. See the
TFT Upload Add-on documentation for details.
Q: Some API actions I was calling from automations are no longer available after migration.
A: The upload_tft and wake_up actions are no longer registered by default to reduce boot
memory usage. Add the corresponding substitutions to your ESPHome YAML to restore them:
substitutions:
  include_action_upload_tft: true  # Restore the upload_tft API action
  include_action_wake_up: true     # Restore the wake_up API action
See Advanced Configuration for details.