NSPanel-Easy
Getting Started with NSPanel HA Blueprint
Welcome to this setup guide, a community-driven approach to integrating NSPanel into your smart home. This guide is designed to be user-friendly, aiming to assist users who have a basic understanding of Home Assistant and ESPHome. While it’s crafted to be accessible at all levels, a foundational knowledge in smart home automation will help you make the most of it.
Whether you’re taking your first steps in customizing your smart home or you’re an enthusiast looking to further personalize your setup, this guide provides essential tools and instructions. Let’s embark on this journey together to create a smart home that’s uniquely yours.
[!TIP] For troubleshooting TFT transfer issues, the most popular topic for new users, please consult our TFT Transfer Troubleshooting Guide.
[!NOTE] We encourage users with absolute beginner-level knowledge in Home Assistant, ESPHome, or YAML editing to familiarize themselves with the basics of these platforms. Our community is here to support, but please note that this guide may not cover the fundamental aspects of Home Assistant and ESPHome extensively.
[!NOTE] Some images or instructions on this guide might be slightly different due to different configurations depending on your ESPHome and Home Assistant implementation or versions.
If you find something that is not understandable or needs to be updated, please let us know. You can create an issue reporting this, or fix it yourself and submit a Pull Request to this repository.
Summary
- Preparation
- ESPHome Firmware
- Upload TFT
- Blueprint
- How to Handle Multiple Panels
- Advanced Configuration for ESPHome and Home Assistant Experts
- Additional Tips and Resources
Preparation
Start by ensuring you have all the necessary tools and files. This includes your NSPanel device, a stable internet connection, and access to your Home Assistant instance.
If flashing it for the first time, please look for additional preparation and tools on the Flashing the device for the first time section later in this guide.
ESPHome Firmware
Preparing the ESPHome Environment
To flash your NSPanel, ESPHome firmware is required. ESPHome can be integrated into your setup in various ways, including as a Home Assistant add-on or through a local installation on your computer. This guide is based on using the ESPHome dashboard, which is available in all standard implementations.
[!NOTE] 4GB of memory are recommended if you are installing ESPHome as a Home Assistant add-on. Therefore, a RasPi 4 with 4GB RAM is the minimum if you are using a Raspberry Pi. A manual installation requires at least 2GB of memory and 500MB of swap space or 3GB of memory. With less memory the compiler will crash!
-
Installing ESPHome as a Home Assistant Add-On: For seamless integration with Home Assistant, ESPHome can be installed as an add-on. This method provides an easy-to-navigate interface and direct integration with your Home Assistant setup. For detailed instructions on this installation method, refer to Getting Started with ESPHome and Home Assistant.
-
Manual Installation of ESPHome: A manual installation on your computer might be preferred if your Home Assistant’s host is resource-limited and struggles with compiling ESPHome projects. Standalone installations on a normal computer typically offer faster and more efficient compiling. This method is ideal if you’re working with a system that doesn’t support Home Assistant add-ons or if you prefer a separate management environment for your ESPHome devices. Detailed steps for a manual installation can be found in the guide Installing ESPHome Manually.
Setting Up a Device on ESPHome Dashboard
Follow these steps to add a new device in the ESPHome Dashboard:
-
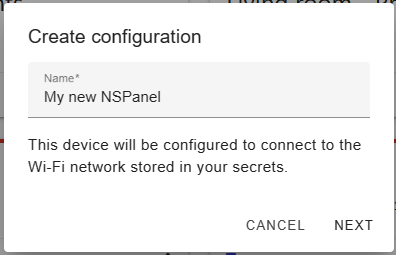
Click the + New Device button.
-
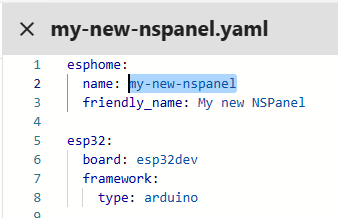
Enter a unique name for your new ESPHome device.
-
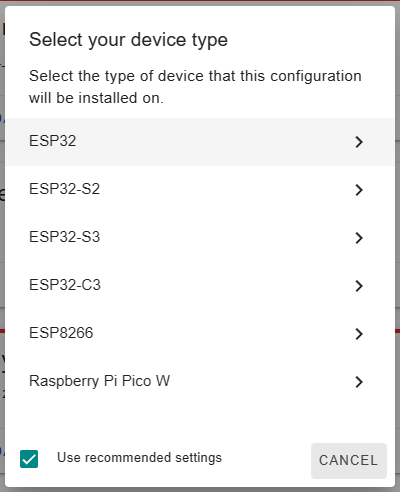
Select ESP32 as the device type.
-
Click Skip as we’re not starting the installation yet.
-
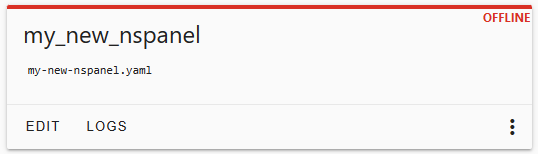
Locate your newly created device in the ESPHome Dashboard and click Edit.
-
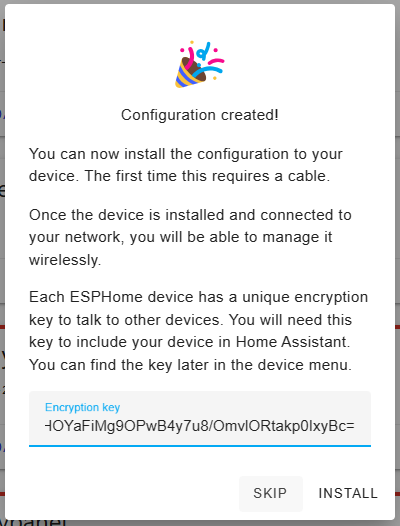
(Optional) For enhanced security, consider copying the
api:entry to your panel’s yaml file while adding the key itself to the secrets file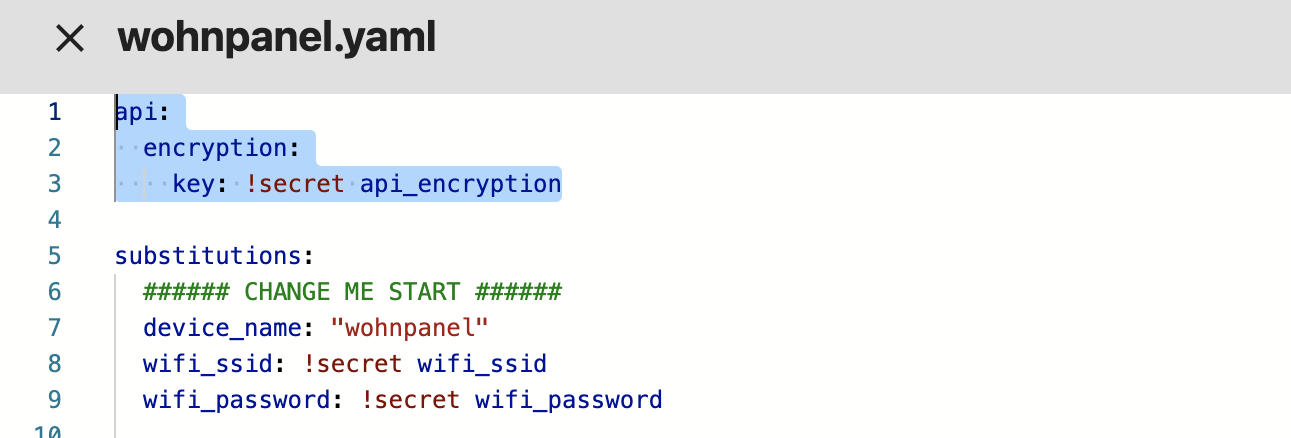
which can be edited clicking
secretsat the top right of your ESPHome menu.
-
Note the device name at the beginning of the file under
esphome.
-
Clear all existing content and paste the following YAML configuration:
substitutions:
  # Settings - Editable values
  device_name: "YOUR_NSPANEL_NAME"
  friendly_name: "Your panel's friendly name"
  wifi_ssid: !secret wifi_ssid
  wifi_password: !secret wifi_password
  ota_password: ""  # Optional: set OTA password, or use ${wifi_password} for backward compatibility (see migration guide)
  language: en      # Language code - see docs/localization.md for all supported codes
  boot_sound: false
  # Add-on configuration (if needed)
  ## Upload TFT
  upload_tft_automatically: true
  ## Climate add-on
  # heater_relay: "1"  # Possible values: "1" or "2"

# Customization area
##### My customization - Start #####
##### My customization - End #####

# Core and optional configurations
packages:
  remote_package:
    url: https://github.com/edwardtfn/NSPanel-Easy
    ref: latest
    refresh: 300s
    files:
      - nspanel_esphome.yaml # Basic package
      # Optional advanced and add-on configurations
      # - esphome/nspanel_esphome_addon_climate_cool.yaml
      # - esphome/nspanel_esphome_addon_climate_heat.yaml
      # - esphome/nspanel_esphome_addon_climate_dual.yaml
      # - esphome/nspanel_esphome_addon_cover.yaml
      # - esphome/nspanel_esphome_addon_display_light.yaml  # Show the display as a light in Home Assistant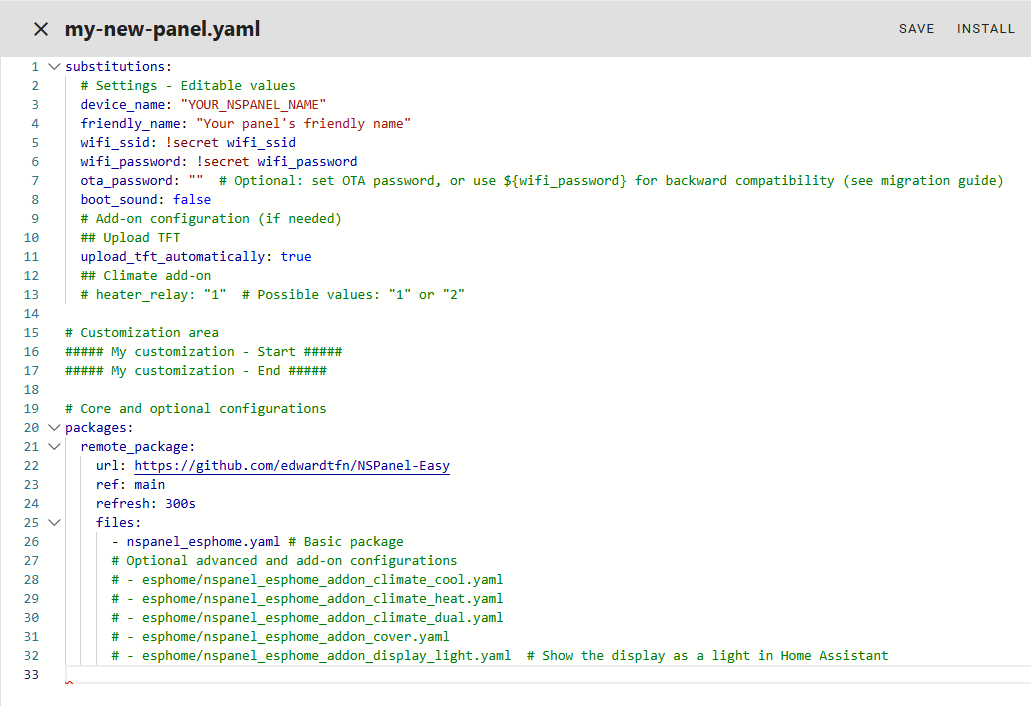
-
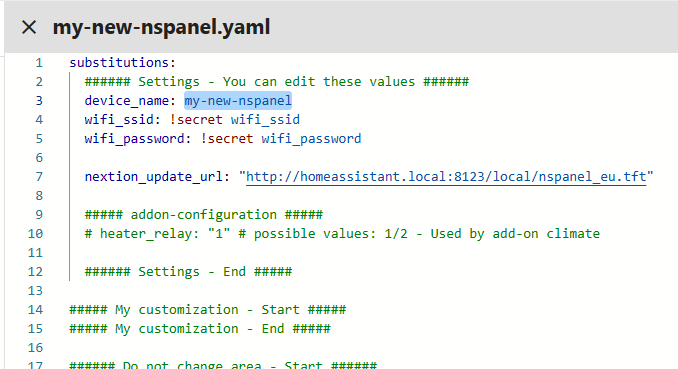
Modify the Settings section with your device name (as noted in step 7) and Wi-Fi details.
-
For Wi-Fi credentials, use
!secretfor added security or input them directly. Learn about secrets in ESPHome: Home Assistant Secrets in ESPHome. - (Optional) If you need to serve TFT files from a local server instead of GitHub,
set
nextion_update_base_urlto your local server’s base URL. For full control over the TFT source (e.g. a custom TFT file), setnextion_update_urlto the exact URL of the file. For more information, see the Upload TFT Add-on documentation.[!CAUTION] Prefer HTTP over HTTPS for file transfer HTTPS support for TFT transfers can be unstable, particularly with the
arduinoframework. Use HTTP whenever possible for local servers. - (Optional) Enhance security with API encryption by adding the copied key from step 6 to the My Customization area.
[!TIP] You can get a new randomly generated valid key from ESPHome Native API Component page.
- After finalizing settings, click Save and close the YAML window.
Your NSPanel is now configured in your ESPHome Dashboard.
Flashing the Device for the First Time
Drive Safe
[!CAUTION] Disconnect your panel’s controller module from main power during all work.
Operating on an open device that’s plugged into the wall puts you at risk of electrocution.
[!WARNING] You are solely responsible for your own safety.
If you’re uncomfortable or if something feels wrong, stop immediately.
- Use only electronic components rated for 3.3VDC. Ensure your TTL adapter is set to 3.3VDC. Exceeding this voltage can cause permanent damage to your panel.
- Maintain a clean work area to prevent damage to your device, especially the screen.
- Keep all small parts, like screws and cables, safely stored.
Required Tools
For first-time flashing of your NSPanel with ESPHome, you may need:
- USB-to-Serial TTL adapter
- Jumper wires
- Breakable headers (optional)
- Appropriate screwdriver to disassemble your panel’s controller module (touch plate)
Connecting Your Device via USB-to-Serial TTL Interface
Before you begin disassembling your panel, it is recommended to review the following resources for guidance:
- YouTube - Mark Watt Tech - HOW TO - Setup the SIMPLEST Smart Home Scene Controller
- @blakadder’s Sonoff NSPanel EU Switch in Detail
- ESPHome - Physically Connecting to Your Device
While this guide does not cover the firmware transfer process in detail, here are some important points to consider during the setup:
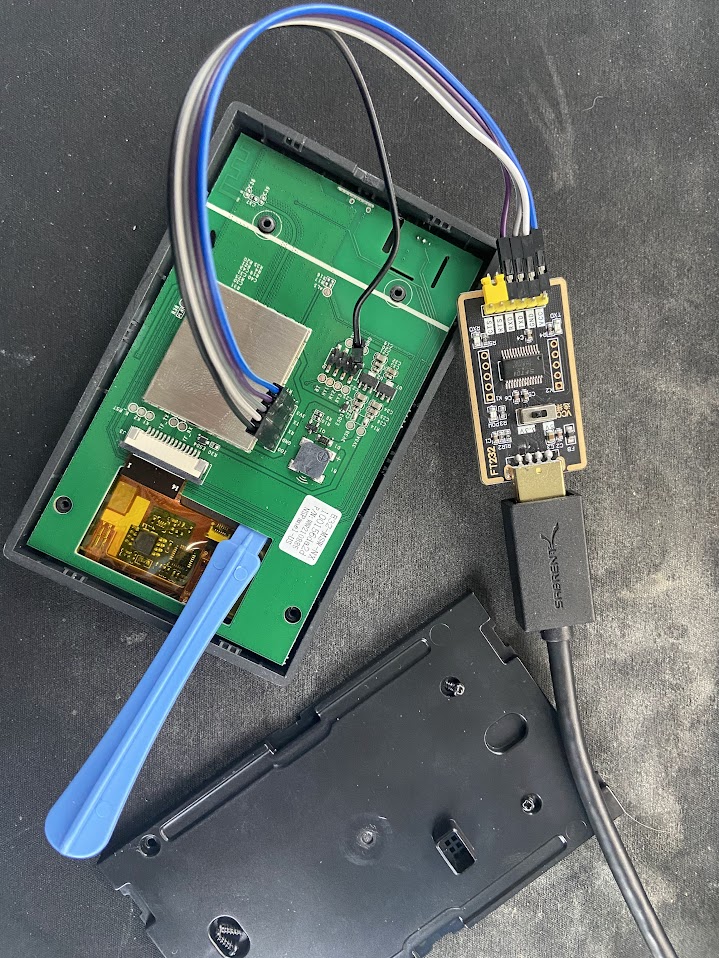
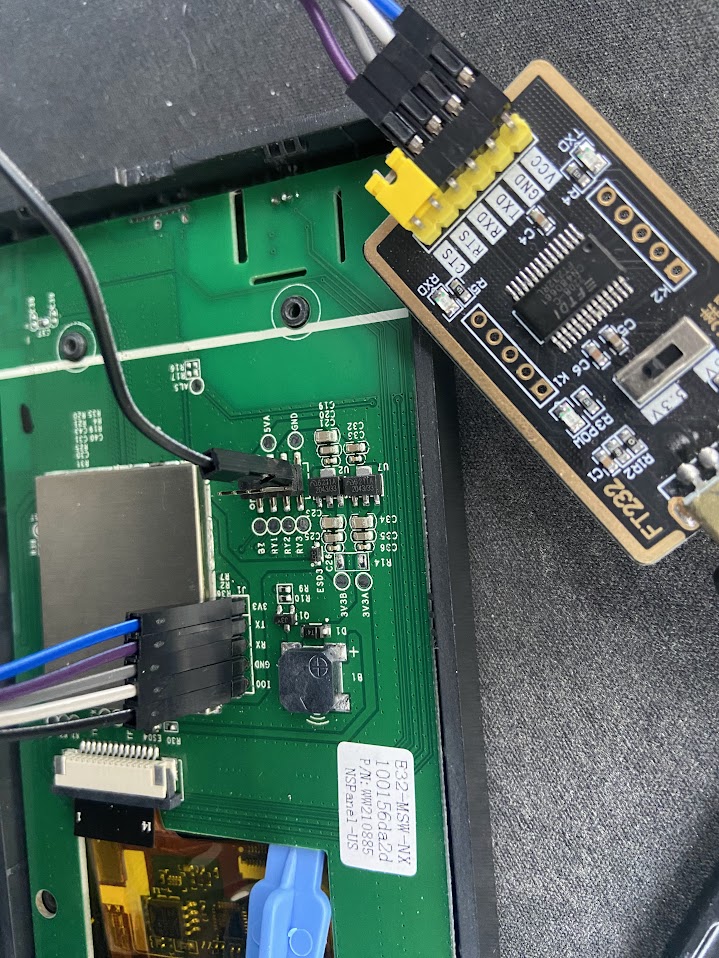

- Handle with care the pins connecting the front panel (which includes the main board and screen) to the back part (the section mounted to the wall). These pins are fragile and can break or bend, potentially rendering your panel nonfunctional.
- Ensure that the pin
IO0on the panel’s board is connected to theGNDpin on the back part connectors. This connection is necessary to put the ESP32 into firmware transfer mode. - Before connecting the TTL adapter to your panel’s board, verify that the adapter is set to output 3.3VDC. Using a voltage higher than 3.3VDC, such as 5VDC, can damage your panel.
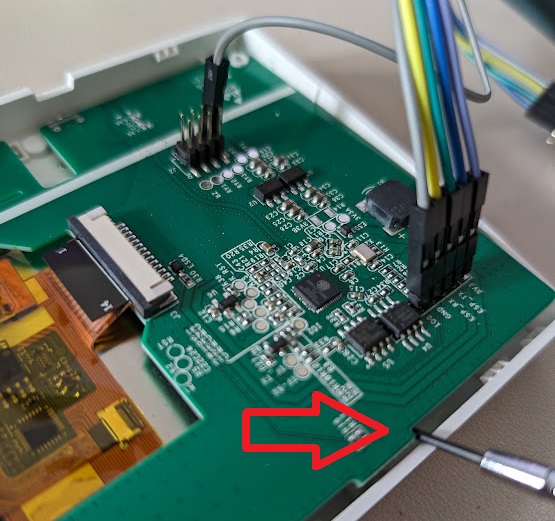
- To avoid short circuits, consider moving the panel’s board away from the metal backing of the display.
The use of a non-conductive tool, like the blue plastic one shown in the picture, can be helpful.
- Note the cross-connection of
RXandTXpins. The following pin-out should be used: | Panel’s Board | TTL USB-to-Serial | | :–: | :–: | |3V3|VCC,3V3, or3.3V| |TX|RX| |RX|TX| |GND|GND| |IO0|GND
This can be connected to aGNDpin on the panel’s board. |
By following these guidelines and referring to the provided resources, you can safely prepare your NSPanel for firmware updates.
Transferring the Firmware to Your Device
After ensuring your device is properly connected, proceed to update or install the firmware using the ESPHome Dashboard.
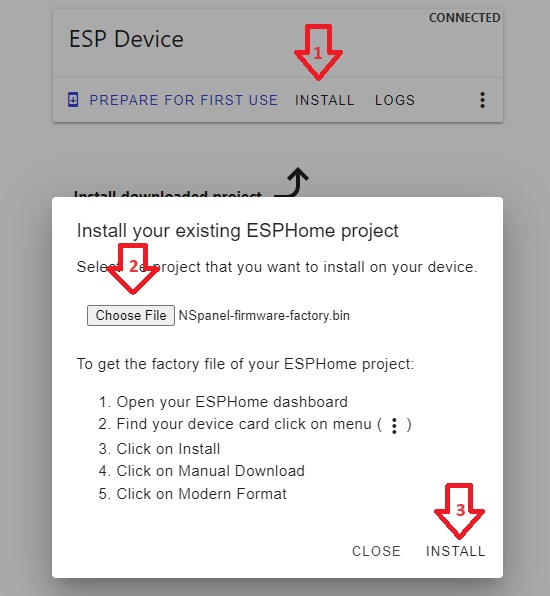
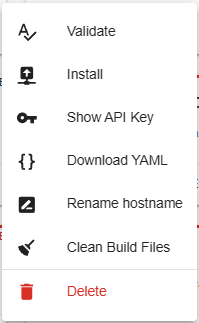
- Access the ESPHome Dashboard and locate your NSPanel device.
-
Open the Installation Options: Click on the three-dot menu next to your device and select Install.

- Choose the Installation Method:
- If you’re updating your panel, the Wirelessly option is typically the right choice. This method will compile and transfer the firmware directly to your panel over Wi-Fi.
- For initial installations or updates via a USB-to-Serial TTL adapter, select either Plug into this computer or Manual download.
Both these options will compile the firmware and allow you to download it to your computer.
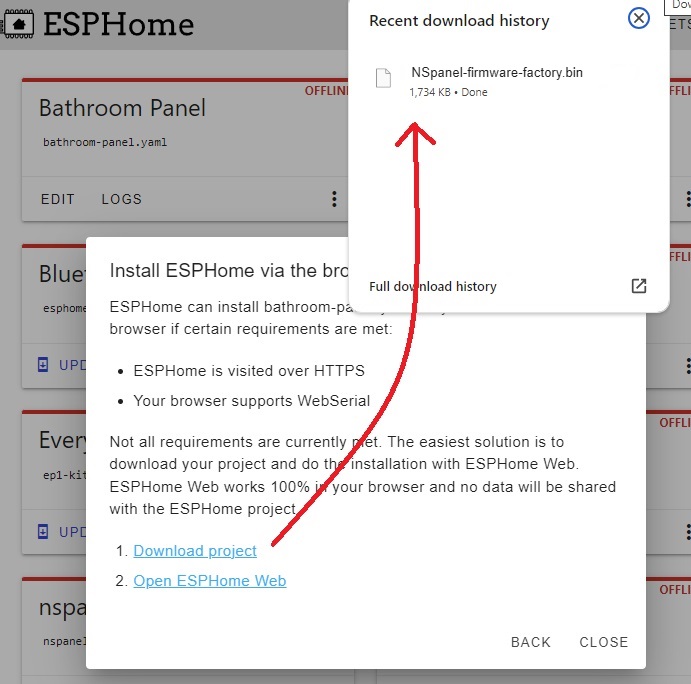
- Transfer Firmware via USB-to-Serial TTL:
- Navigate to ESPHome Web on your computer.
-
Click Connect and choose the serial interface connected to your USB-to-Serial TTL adapter.
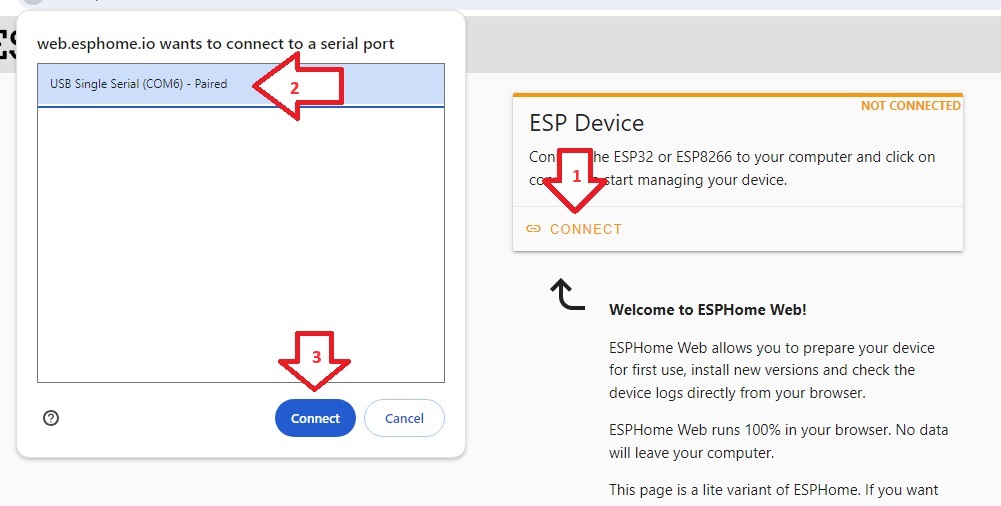
- Once connected, opt to install an existing firmware to your panel.
Select the compiled firmware file and initiate the installation.
The firmware installation process will take a few minutes. After completion, reassemble your panel and mount it back on the wall. Power it up, and it should appear online in the ESPHome Dashboard within a couple of minutes, running the latest firmware.
What to Expect on First Boot
After the firmware is flashed and the panel powers up for the first time, the system goes through several startup steps before the display becomes responsive. During this period — usually a couple of minutes — the ESPHome logs will show repeated warnings such as:
[W][nextion:xxx]: Not connected
This is expected. The firmware first probes the configured UART baud rate and, if needed, runs a scan across Nextion-supported rates (including a display power-cycle), which can take some time on first boot, especially if the panel still has the original Sonoff firmware (which uses a different baud rate than NSPanel Easy).
Once the baud rate is detected, the firmware checks the TFT version. If the version
does not match what the firmware expects, auto-upload can start automatically when
upload_tft_automatically: true and a valid non-blank Display Model is selected.
The TFT transfer typically takes 10–20 minutes, and you can follow progress in ESPHome logs.
[!TIP] Auto-upload of the TFT is enabled by default. To disable it, add the substitution
upload_tft_automatically: falseto your ESPHome YAML and re-flash.
If upload_tft_automatically is enabled and, after a few minutes, the panel is still
showing only Not connected warnings with no upload start, see the
TFT Transfer Troubleshooting Guide.
Integrating your panel to Home Assistant
Once your panel loaded the new ESPHome firmware, it should be automatically detected by Home Assistant and you should get a notification about that. If that isn’t happening, you can manually add it as a new integration with the following steps:
[!TIP] You can use this link to go directly to the dialog to add a new ESPHome device, then you can go directly to step 3.
- Go to your ESPHome integration’s page under Settings > Devices & services > ESPHome.
- If your panel is automatically discovered, just click Configure, otherwise, click on Add device.
- Enter your new panel’s hostname or IP address and click Next.
- Follow the instructions from your Home Assistant to add your new panel.
After that, you will have access to the Device’s page related to your NSPanel. On that page you will find all the entities published by the ESPHome firmware installed in your panel, which can be used to see its status and control some of its settings.
It might take a minute or two until the device’s page gets fully populated, but when that is completed, take a look around and get familiar with that page.
You can always get back to the device’s page under your ESPHome integration’s page.
Making Changes Over The Air (OTA)
Once your NSPanel is flashed with ESPHome, updating the firmware wirelessly via Over The Air (OTA) updates is a straightforward process. This method eliminates the need for a USB-to-serial TTL adapter for most firmware updates.
Steps for OTA Updates
-
After making your changes in the yaml editor, click the Install button located at the top of the editor. Alternatively, you can click the three-dot menu next to your device on the ESPHome Dashboard and select Install.
-
A dialog box will appear with different installation options:
-
Choose the first option to transfer the firmware Wirelessly. ESPHome will compile the firmware with the new settings and automatically transfer it to your device via Wi-Fi.
- The compilation and transfer process may take a few minutes.
- Once complete, your panel will restart automatically with the new firmware.
Using OTA for firmware updates is a time-efficient way to keep your NSPanel updated with the latest changes and enhancements, ensuring a smooth and hassle-free user experience.
Updating Your NSPanel Firmware
Regularly updating your NSPanel firmware ensures that you have the latest features and improvements from this project and ESPHome. To update your device’s firmware to the latest version, simply follow the Steps for OTA Updates as outlined above.
[!IMPORTANT]
This project comprises three integral parts: ESPHome, the TFT file, and the Blueprint. It is crucial that all three components are updated to the same version to ensure compatibility and optimal performance. When updating the ESPHome firmware, make sure to also update the TFT file and the Blueprint to the corresponding version.
Keeping each component of the NSPanel HA Blueprint in sync with the same version enhances the stability and functionality of your smart panel.
Other
Please try the standard process and if you find any issue, please create a new issue and inform which custom firmware you have installed before migrating to NSPanel HA Blueprint.
Upload TFT
The NSPanel utilizes a Nextion display, which is equipped with its own controller, memory, and firmware. This setup enables the display to render UI components and respond to commands sent from ESPHome. The firmware and UI elements for the Nextion display are compiled into a TFT file, which needs to be loaded onto the display for proper functionality.
ESPHome manages the transfer of the TFT file to the Nextion display. It does this by connecting to an HTTP/HTTPS server, downloading the required TFT file, and then transferring it to the display. This process is crucial for updating or changing the UI and functionality of the display.
In our GitHub repository, you can find all the necessary TFT files for this project, catering to different models of the NSPanel. These files are specifically designed to work with the various functionalities and features provided in each update of the NSPanel HA Blueprint.
Make sure to select and upload the correct TFT file corresponding to your specific model of NSPanel to ensure smooth operation and access to all the latest features.
[!TIP] For troubleshooting TFT transfer issues, consult our TFT Transfer Troubleshooting Guide.
Select the right file
Open the device’s page under ESPHome integration’s page and look for Update TFT display and Display Model under the Configuration area.
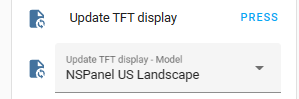
Expand the Display Model control and find the model that better fits your panel:

The options are:
- NSPanel EU: Select this when using a Sonoff NSPanel EU model.
- NSPanel US: Select this when using a Sonoff NSPanel US model installed in the normal (portrait) position, with buttons below the screen.
- NSPanel US Landscape: Select this when using a Sonoff NSPanel US model installed in landscape position, with buttons at the right side of the screen.
- NSPanel Blank: A minimal TFT file that displays a QR code linking to the setup instructions. Useful for first-time installations to clear the Nextion Active Reparse Mode left by Sonoff’s original firmware or other custom implementations before uploading the full TFT file.
Uploading to Nextion
Once the right model is selected, please press the button Update TFT display.
In a few seconds your display should start transferring the file correspondent to the selected model. The transfer screen shows a progress bar with a percentage counter with a black background.
If the transfer don’t starts in a few seconds, ESPHome will retry automatically a few times, with different transfer parameters, so the transfer can take up to a minute to start.
Once started, the transfer shouldn’t take more than 10 to 20 minutes. If after this time it isn’t close to finnish, please cancel the process by restarting your device, then try it again.
[!TIP] For troubleshooting TFT transfer issues, consult our TFT Transfer Troubleshooting Guide.
Troubleshooting TFT transfer issues
We have an useful guide for troubleshooting TFT transfer issues. Please take a look there.
Blueprint
This section provides guidance on importing the NSPanel HA Blueprint from our GitHub repository into your Home Assistant, creating a new automation for your panel setup, and updating the blueprint when new versions are available. These processes are straightforward with the latest versions of Home Assistant. If you have any questions or need clarification, please reach out to us.
Importing the Blueprint
Importing the blueprint into Home Assistant is a simple process. Just click the button below and follow the steps:

Creating an Automation
After importing the Blueprint into Home Assistant, create a new automation using these steps:
- Go to Settings → Automations & Scenes → Blueprints in Home Assistant.
- Find the NSPanel Configuration Blueprint and click on it.
- In the Blueprint settings, select your panel in the NSPanel device field.
- Complete the relevant settings and click the Save button.
- Name your automation for easy identification and click Rename.

[!TIP] For a comprehensive list of panel settings, refer to the Blueprint Guide.
Editing Automation Settings
You can modify your automation anytime to change configurations:
-
In Home Assistant, go to Settings → Automations & Scenes. Or use the link below.

-
Find your automation in the list and click on it to edit.
-
After making changes, click Save. The new settings will be sent to your panel, usually within seconds. Some changes may require a page reload on the panel to appear.
[!TIP] For a comprehensive list of panel settings, refer to the Blueprint Guide.
How to Handle Multiple Panels
For homes with multiple panels:
-
Repeat the steps in the “Blueprint” section for each panel.
-
Ensure each panel has a unique entry in the ESPHome Dashboard and in Home Assistant under Settings → Devices & services → ESPHome.
-
Create a separate automation for each panel in Home Assistant.
[!IMPORTANT] Avoid assigning the same panel to multiple automations. This can cause unexpected behavior and put extra load on Home Assistant and your Wi-Fi network. Currently, Home Assistant does not have a mechanism to prevent this.
Advanced Configuration for ESPHome and Home Assistant Experts
[!WARNING] Customizations and advanced mode are not supported by this project’s team. Use them with caution and only if you have the necessary expertise.
Before customizing your system, we encourage you to share any enhancements you make.
Consider creating a Pull Request to the dev branch to share your discoveries with the community.
Understanding Package Organization and Memory Management
The NSPanel HA Blueprint utilizes a modular package structure designed for flexibility and optimal memory usage. Understanding this architecture enables advanced users to customize their installation based on specific needs and memory constraints.
Package Structure Overview
The main nspanel_esphome.yaml file includes several sub-packages:
packages:
  core_package: !include esphome/nspanel_esphome_core.yaml      # Core NSPanel functionality (display, PSRAM, etc.)
  standard_package: !include esphome/nspanel_esphome_standard.yaml  # Standard UI and features
  upload_tft_package: !include esphome/nspanel_esphome_addon_upload_tft.yaml  # TFT upload capabilities
Each package serves a specific purpose:
core_package: Contains essential ESPHome configuration and NSPanel hardware support including display communication, PSRAM configuration, base sensors, and fundamental device functionalitystandard_package: Implements the standard user interface elements and basic automation features documented in our guidesupload_tft_package: Includes components necessary for TFT file transfer to the Nextion display
Memory Optimization Strategies
The ESP32 in the NSPanel has limited flash memory, and advanced users may need to optimize memory usage when adding custom components like Bluetooth Proxy, additional sensors, or custom automations.
Granular Package Selection
Instead of using the main nspanel_esphome.yaml, advanced users can reference individual packages directly:
substitutions:
  device_name: "your_nspanel_name"
  friendly_name: "Your Panel Name"
  wifi_ssid: !secret wifi_ssid
  wifi_password: !secret wifi_password
  ota_password: ""  # Optional: set OTA password, or use ${wifi_password} for backward compatibility (see migration guide)
  language: en      # Language code - see docs/localization.md for all supported codes
  boot_sound: false
  # Add-on configuration (if needed)
  ## Upload TFT
  upload_tft_automatically: true
  ## Climate add-on
  # heater_relay: "1"  # Possible values: "1" or "2"

##### My customization - Start #####
# Add your custom components here
# Bluetooth Proxy with smart scanning (only when HA is connected)
bluetooth_proxy:

esp32_ble_tracker:
  scan_parameters:
    continuous: false

api:
  on_client_connected:
    then:
      - esp32_ble_tracker.start_scan:
          continuous: true
  on_client_disconnected:
    then:
      - esp32_ble_tracker.stop_scan:
##### My customization - End #####

packages:
  remote_package:
    url: https://github.com/edwardtfn/NSPanel-Easy
    ref: latest
    refresh: 300s
    files:
      - esphome/nspanel_esphome_core.yaml        # Core NSPanel functionality
      - esphome/nspanel_esphome_standard.yaml    # Standard features
      # - esphome/nspanel_esphome_addon_upload_tft.yaml  # Temporarily disabled
This approach allows you to:
- Enable only required functionality
- Temporarily disable memory-intensive components
- Add custom components while maintaining core functionality
Reducing Registered API Actions
Each API action registered by ESPHome consumes heap memory at boot. On memory-constrained configurations — such as those running Bluetooth Proxy — this can cause boot instability or crashes.
The following actions are excluded by default because most users never call them directly from Home Assistant scripts or automations, and excluding them recovers memory without affecting standard panel functionality:
| Action | Default | Re-enable with |
|---|---|---|
upload_tft |
excluded | include_action_upload_tft: true |
wake_up |
excluded | include_action_wake_up: true |
To re-enable one or both, add the corresponding substitution:
substitutions:
  include_action_upload_tft: true  # Register the upload_tft API action
  include_action_wake_up: true     # Register the wake_up API action
upload_tft — triggers a TFT file upload from a specified URL. Not needed if you rely
on the “Update TFT display” button in Home Assistant or automatic upload on boot, which cover
all standard workflows.
wake_up — wakes the display from sleep and optionally resets the sleep and dimming
timers. Not needed if your panel wakes on touch or via other automations that do not call
this service directly.
[!IMPORTANT] If either of these actions has stopped appearing in Home Assistant after a firmware update and you were calling them from automations or scripts, add the corresponding
include_action_*: truesubstitution to restore them. This is a deliberate breaking change introduced to improve boot stability on memory-constrained devices.
Dynamic Memory Management
For scenarios requiring temporary memory trade-offs (e.g., TFT updates vs. Bluetooth functionality):
Option 1: TFT Update Configuration
# Configuration for TFT updates - Disable Bluetooth temporarily
substitutions:
  device_name: "your_nspanel_name"
  friendly_name: "Your Panel Name"
  wifi_ssid: !secret wifi_ssid
  wifi_password: !secret wifi_password
  ota_password: ""  # Optional: set OTA password, or use ${wifi_password} for backward compatibility (see migration guide)
  language: en      # Language code - see docs/localization.md for all supported codes
  boot_sound: false
  # Add-on configuration (if needed)
  ## Upload TFT
  upload_tft_automatically: true
  ## Climate add-on
  # heater_relay: "1"  # Possible values: "1" or "2"

##### My customization - Start #####
# Bluetooth components commented out during TFT updates
# bluetooth_proxy:
# esp32_ble_tracker:
#   scan_parameters:
#     continuous: false
# api:
#   on_client_connected:
#     then:
#       - esp32_ble_tracker.start_scan:
#           continuous: true
#   on_client_disconnected:
#     then:
#       - esp32_ble_tracker.stop_scan:
##### My customization - End #####

packages:
  remote_package:
    url: https://github.com/edwardtfn/NSPanel-Easy
    ref: latest
    refresh: 300s
    files:
      - esphome/nspanel_esphome_core.yaml
      - esphome/nspanel_esphome_standard.yaml
      - esphome/nspanel_esphome_addon_upload_tft.yaml  # Enable for updates
Option 2: Runtime Configuration
# Configuration for normal operation - Enable Bluetooth, disable TFT upload
substitutions:
  device_name: "your_nspanel_name"
  friendly_name: "Your Panel Name"
  wifi_ssid: !secret wifi_ssid
  wifi_password: !secret wifi_password
  ota_password: ""  # Optional: set OTA password, or use ${wifi_password} for backward compatibility (see migration guide)
  language: en      # Language code - see docs/localization.md for all supported codes
  boot_sound: false
  # Add-on configuration (if needed)
  ## Upload TFT
  upload_tft_automatically: true
  ## Climate add-on
  # heater_relay: "1"  # Possible values: "1" or "2"

##### My customization - Start #####
# Bluetooth Proxy with smart scanning (only when HA is connected)
bluetooth_proxy:

esp32_ble_tracker:
  scan_parameters:
    continuous: false

api:
  on_client_connected:
    then:
      - esp32_ble_tracker.start_scan:
          continuous: true
  on_client_disconnected:
    then:
      - esp32_ble_tracker.stop_scan:
##### My customization - End #####

packages:
  remote_package:
    url: https://github.com/edwardtfn/NSPanel-Easy
    ref: latest
    refresh: 300s
    files:
      - esphome/nspanel_esphome_core.yaml
      - esphome/nspanel_esphome_standard.yaml
      # - esphome/nspanel_esphome_addon_upload_tft.yaml  # Disabled for memory
Memory Usage Monitoring
The core package includes memory reporting functionality. Monitor your device’s memory usage through ESPHome logs:
[NSPanel Easy] ESPHome:
[NSPanel Easy]   Version:     2024.12.0
[NSPanel Easy]   Free heap:
[NSPanel Easy]     Internal:   45000 bytes (65.2%)
[NSPanel Easy]     PSRAM:    3900000 bytes (95.1%)
Use this information to determine if additional components can be safely added or if memory optimization is required.
Practical Example: Bluetooth Proxy Integration
Here’s a complete workflow for integrating Bluetooth Proxy while managing memory constraints:
-
Initial Setup with TFT Support:
substitutions: device_name: "your_nspanel_name" friendly_name: "Your Panel Name" wifi_ssid: !secret wifi_ssid wifi_password: !secret wifi_password ota_password: "" # Optional: set OTA password, or use ${wifi_password} for backward compatibility (see migration guide) language: en # Language code - see docs/localization.md for all supported codes boot_sound: false # Add-on configuration (if needed) ## Upload TFT upload_tft_automatically: true ## Climate add-on # heater_relay: "1" # Possible values: "1" or "2" ##### My customization - Start ##### # Bluetooth disabled during initial TFT upload ##### My customization - End ##### packages: remote_package: files: - esphome/nspanel_esphome_core.yaml - esphome/nspanel_esphome_standard.yaml - esphome/nspanel_esphome_addon_upload_tft.yaml -
Flash firmware and upload TFT file
-
Switch to Bluetooth Configuration:
substitutions: device_name: "your_nspanel_name" friendly_name: "Your Panel Name" wifi_ssid: !secret wifi_ssid wifi_password: !secret wifi_password ota_password: "" # Optional: set OTA password, or use ${wifi_password} for backward compatibility (see migration guide) language: en # Language code - see docs/localization.md for all supported codes boot_sound: false # Add-on configuration (if needed) ## Upload TFT upload_tft_automatically: true ## Climate add-on # heater_relay: "1" # Possible values: "1" or "2" ##### My customization - Start ##### # Bluetooth Proxy with smart scanning (only when HA is connected) bluetooth_proxy: esp32_ble_tracker: scan_parameters: continuous: false api: on_client_connected: then: - esp32_ble_tracker.start_scan: continuous: true on_client_disconnected: then: - esp32_ble_tracker.stop_scan: ##### My customization - End ##### packages: remote_package: files: - esphome/nspanel_esphome_core.yaml - esphome/nspanel_esphome_standard.yaml # TFT upload package commented out to save memory -
For future TFT updates: Temporarily revert to configuration from step 1, perform update, then switch back to step 3.
Advanced ESPHome Configuration
Local Package Management
For advanced customization with ESPHome, you can use local copies of the package files. This approach provides greater control and faster compilation times:
substitutions:
  device_name: "your_nspanel_name"
  friendly_name: "Your Panel Name"
  wifi_ssid: !secret wifi_ssid
  wifi_password: !secret wifi_password
  ota_password: ""  # Optional: set OTA password, or use ${wifi_password} for backward compatibility (see migration guide)
  language: en      # Language code - see docs/localization.md for all supported codes
  boot_sound: false
  # Add-on configuration (if needed)
  ## Upload TFT
  upload_tft_automatically: true
  ## Climate add-on
  # heater_relay: "1"  # Possible values: "1" or "2"

##### My customization - Start #####
# Your custom components and modifications
##### My customization - End #####

packages:
  local_core: !include packages/nspanel_esphome_core.yaml
  local_standard: !include packages/nspanel_esphome_standard.yaml
  # Optional packages based on your needs
  # local_upload_tft: !include packages/nspanel_esphome_addon_upload_tft.yaml
[!NOTE] A sub-folder is recommended to prevent package files from appearing as additional devices in the ESPHome dashboard. Alternatively, you can prefix filenames with
.to exclude them from the device list.
Framework Considerations
The choice of ESP32 framework significantly impacts memory usage and component compatibility:
- ESP-IDF Framework (Recommended): Lower memory footprint, better Bluetooth support, optimal for advanced features
- Arduino Framework: Higher memory usage, may cause compilation failures with memory-intensive components
For Bluetooth-enabled configurations, always use ESP-IDF:
esp32:
  board: esp32dev
  framework:
    type: esp-idf
Custom Component Integration
When adding custom components, consider their memory impact and interaction with existing packages:
##### My customization - Start #####
# Example: Adding a custom sensor while monitoring memory
sensor:
  - platform: custom_sensor
    name: "My Custom Sensor"
    # Ensure this doesn't conflict with core functionality

# Optimized Bluetooth Proxy configuration
bluetooth_proxy:

esp32_ble_tracker:
  scan_parameters:
    continuous: false

api:
  on_client_connected:
    then:
      - esp32_ble_tracker.start_scan:
          continuous: true
  on_client_disconnected:
    then:
      - esp32_ble_tracker.stop_scan:

# Custom automations
script:
  - id: my_custom_script
    then:
      - lambda: |-
          // Custom logic here
          ESP_LOGI("custom", "Memory available: %d", ESP.getFreeHeap());
##### My customization - End #####
Advanced Blueprint Configuration
The Blueprint file nspanel_easy_blueprint.yaml can be customized for specific use cases.
While the standard Blueprint handles most scenarios, advanced users may need specialized automations.
For local Blueprint modifications:
- Download
nspanel_easy_blueprint.yamlfrom the repository - Modify according to your requirements
- Import the local file instead of the remote URL
[!WARNING] Local Blueprint modifications will not receive automatic updates. You’ll need to manually merge changes from new releases.
Advanced TFT File Customization
All .HMI source files are available in the repository for custom TFT development:
- Download Nextion Editor: Nextion Editor
- Modify
.HMIfiles: Customize the user interface according to your needs - Compile to
.TFT: Generate custom TFT files for your specific requirements - Host the file: Make it accessible via HTTP for your panel
For guidance on Nextion development:
Memory Optimization Best Practices
- Monitor Memory Usage: Regularly check memory reports in ESPHome logs
- Use Granular Packages: Include only necessary functionality
- Framework Selection: Prefer ESP-IDF for advanced features
- Temporary Configurations: Switch configurations for specific tasks (TFT updates)
- PSRAM Utilization: Leverage the 8MB PSRAM for larger components while keeping core functionality in internal memory
Advanced Troubleshooting
When working with custom configurations:
- Compilation Errors: Often related to memory constraints or conflicting dependencies
- Runtime Issues: Monitor memory usage and check for component conflicts
- Package Conflicts: Ensure custom packages don’t override essential functionality
- Framework Issues: Verify framework compatibility with custom components
For debugging, enable verbose logging for the specific components:
logger:
  level: VERBOSE
  logs:
    nextion: VERBOSE
    esp32_ble_tracker: DEBUG
    bluetooth_proxy: DEBUG
This enhanced documentation provides advanced users with the knowledge needed to optimize their NSPanel configurations while maintaining system stability and functionality.
Additional Tips and Resources
[!TIP] For troubleshooting TFT transfer issues, consult our TFT Transfer Troubleshooting Guide first.
If problems persist after troubleshooting, visit the Issues page. Feel free to create a new issue for personalized assistance, providing details such as:
- A description or picture of what is displayed on your screen.
- Information on whether you are updating from a previous version of this project, migrating from another NSPanel customization, or customizing a panel with the original Sonoff settings.
- ESPHome logs from the start of your panel to the point where the upload fails.
- A description of what you have already tried.
Important Note
Remember, these instructions serve as a guideline and may vary based on your specific setup and any systems previously installed.