NSPanel-Easy
How-to
In this document, we collect important information, tips, and solutions related to various topics noticed over time. This is a community-driven resource, and we encourage everyone to contribute their knowledge.
Community Contribution
If you have a solution or tip to share, please contribute! Your knowledge can significantly help others in the community. You can write a short message with your findings, and we’ll include it here.
Topics and Solutions
Below are the topics covered in this document, each with relevant tips and solutions.
- How do I create “Issues” when I have a problem
- Update Blueprint
- Update ESPHome
- Update TFT
- Notification via HA
- Climate control with relays
- Call a page directly
- Play RTTTL Sound
- Start automations via Input_Boolean
- Updating Wi-Fi and OTA passwords in ESPHome with this project
How to create “issues” when I have a problem
To be able to solve your problem, it is important for us to have as much information as possible.
- Describe your problem as detailed as possible.
- Please write your ESPHome and Home Assistant version, as the version of files of this project (TFT, ESPHome and Blueprint).
- Please go to your automation and then to the “3 dots” and then to Edit as YAML. Copy the complete code and attach it to the ticket
- An important “helper” for solving problems is the trace of an automation. You can find the trace under Settings –> Automations & Scenes –> your NSPanel automation –> Traces (top right)
[!NOTE] TRACES! Please execute again what does not work and open the trace immediately afterwards. Often you have to open the trace after the reboot too. During the startup, most things are loaded.
[!IMPORTANT]
In the trace you can see by the “orange “ lines which way the automation has gone. Please tell us this path. Also, please take one or more screenshots and add them to your ticket. Especially important for us is where the “Orange “ line ends, because most of the time this is also where the problem is.
[!IMPORTANT]
When you have opened the trace, there is a “timestamp “ at the top. It is important that you select the correct timestamp.
Example trace after reboot

Example automations Blueprint
alias: YYXYYXYYX - NSPanel Configuration
description: ""
use_blueprint:
  path: nspanel_configuration.yaml
  input:
    nspanel_name: nspanel_dev
    language: DE
    sync_value_ha: select_no
    sync_slider_ha: select_no
    weather: AccuWeather
    accuweather: home_wetter
    outdoortemp: sensor.terrasse_garage_motion_sensor_temperature
    humidity: sensor.kinderzimmer_lea_temperatur_sensor_humidity
    climate: climate.nspanel_buro
    left_button_entity: light.haustur_spot_2
    right_button_entity: light.haustur_spot_1
    entity01: light.buro_sideboard
    entity01_name: Sideboard
    entity02: cover.kuche_rollo
    entity02_name: Küche Rollo
    entity03: switch.buro_dart_beleuchtung
    entity03_name: Dart Licht
    delay: 2
    right_button_name: Test 1
    left_button_name: Test 2
Update Blueprint
[!IMPORTANT] To install a new version of the NSPanel, the Blueprint, ESPHome and the TFT must be updated!
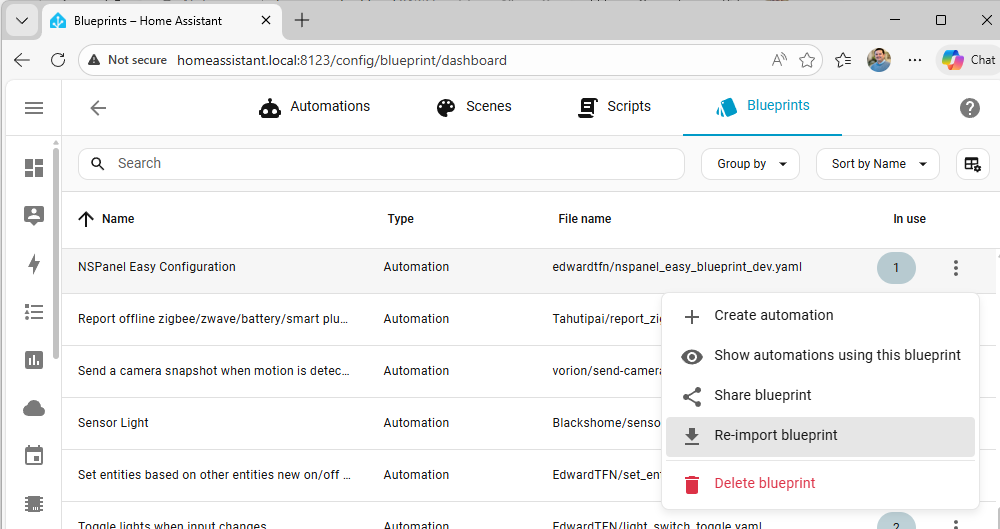
- In Home Assistant, go to Settings > Automation & Scenes, select the tab Blueprints and find the blueprint named “NSPanel Configuration”
-
Click the 3-dot menu and select “Re-import blueprint”:
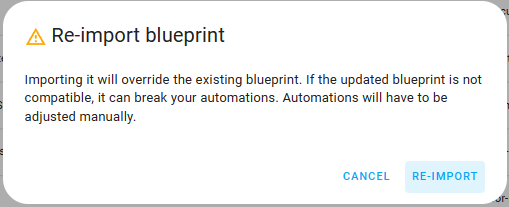
-
Click “Re-import” button:
- The new Blueprint is now available. Settings that have already been made are adopted.
- Please review the blueprint settings (under Automations tab) for new settings available with the new version.
Update ESPHome
[!IMPORTANT] To install a new version of the NSPanel, the Blueprint, ESPHome and the TFT must be updated!
[!IMPORTANT] These instructions are for updating a panel where an older version of these files are already installed.
These are the steps to flash your panel with an updated version from this project:
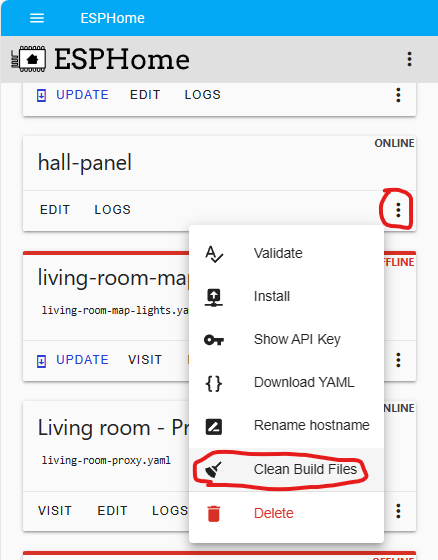
-
Go to the ESPHome dashboard (in your Home Assistant) and find the device you want to update. Then click the 3-dot menu and select the option “Clean Build Files” to make sure you clean-up your system from the previous versions files:
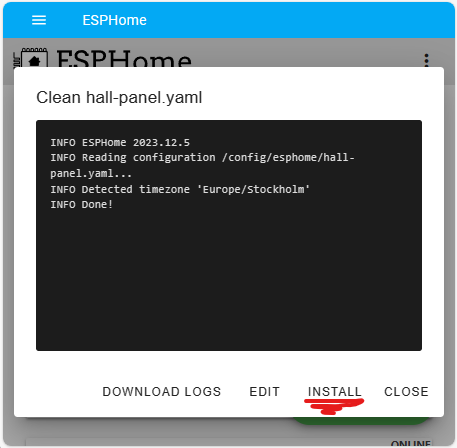
-
When the clean-up process is done, click on Install button:
-
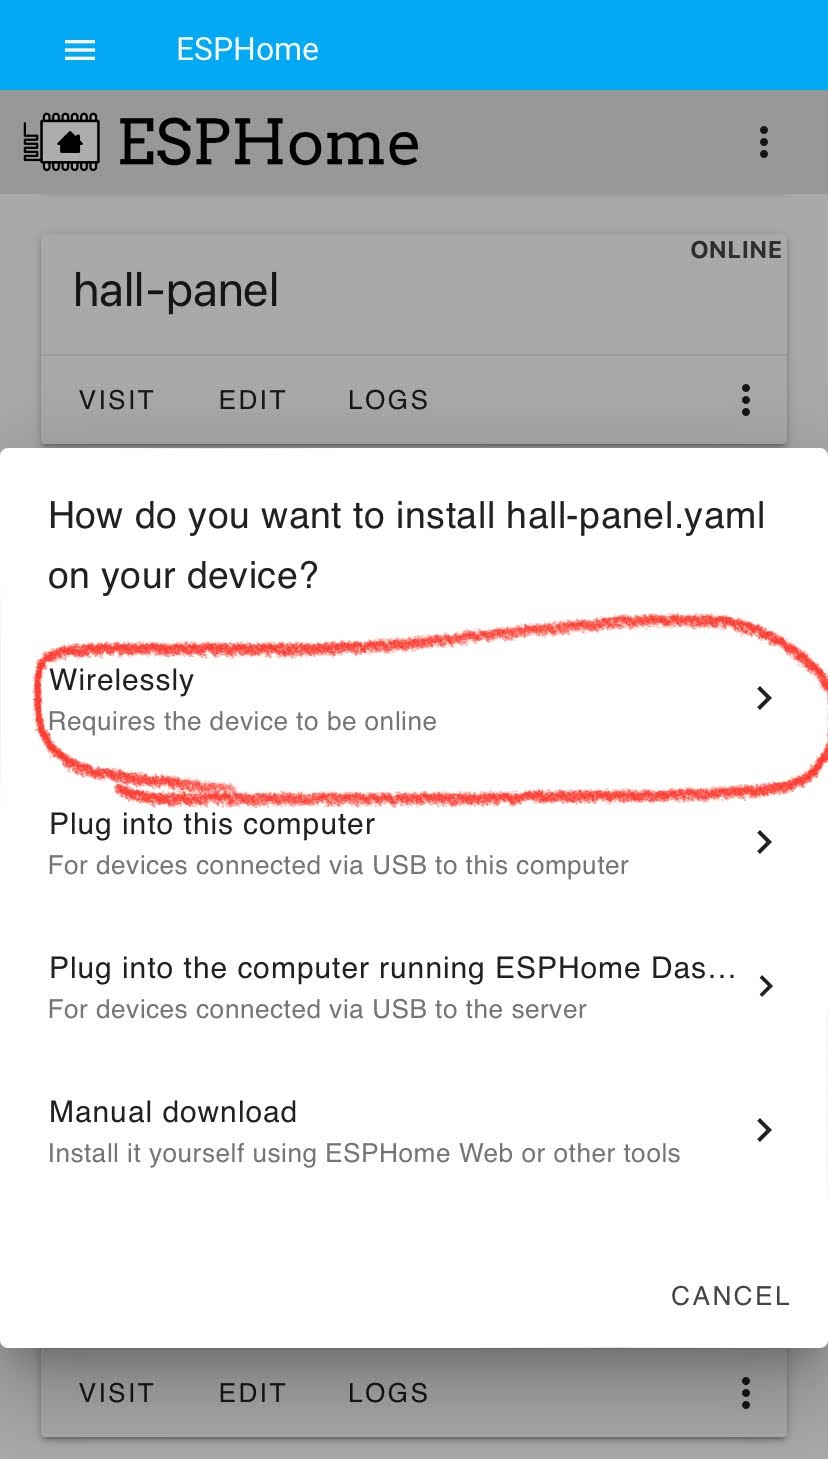
As your panel is probably already connected to the Wi-Fi, you may select to install Wirelessly, as it is much easier and you don’t have to disassemble your panel.
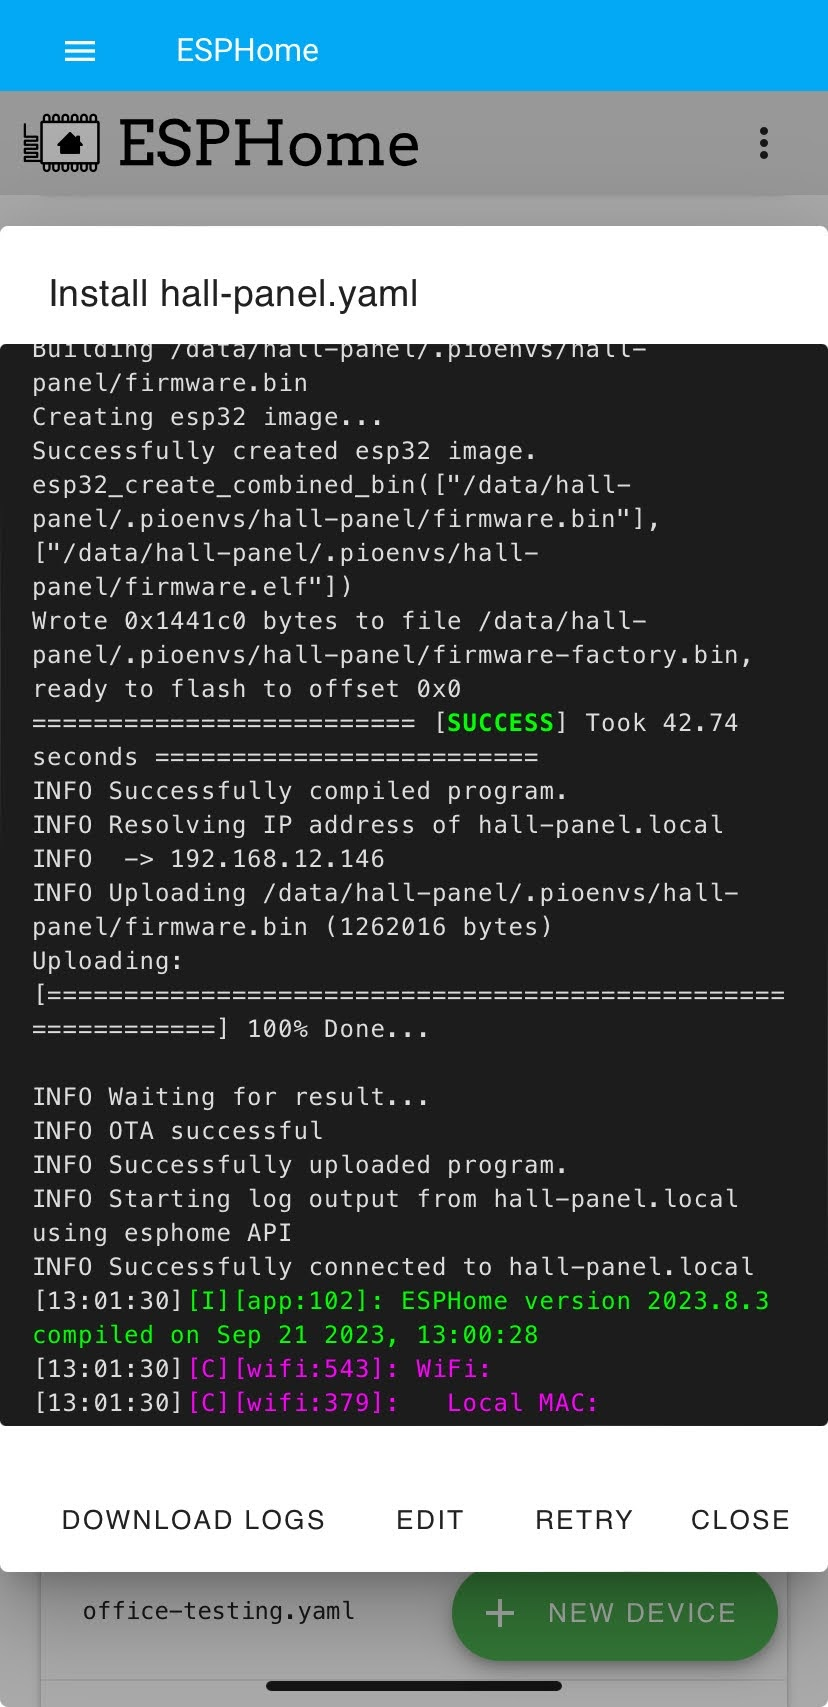
The new firmware will be built and then flashed to your panel, which will restart at the end of this process and start sending logs again:
Update TFT
[!IMPORTANT] These instructions are for updating a panel where an older version of these files are already installed.
- Go to Settings –> Devices & services –> Integrations, select the display under the ESPHome integration.
- Select the “Update TFT Display - Model” accordingly, under Configuration.
- Press the button “Update TFT Display”.
- The display starts the update process and then restarts.
Notification via HA
To show a notification on the NSPanel, the following action call can be used:
action: esphome.panelname_notification_show
data:
  label: Example label text
  message: Example message text
[!NOTE] For more details about this action call, please refer to our API documentation.
To clear any notifications, the following action call can be used:
action: esphome.panelname_notification_clear
[!NOTE] For more details about this action call, please refer to our API documentation.
To use the notifications in an automation, again simply use the action call as shown in the example below:
description: ""
mode: single
trigger:
  - platform: state
    entity_id:
      - binary_sensor.motion_detector
    to: "on"
condition: []
action:
  - action: esphome.panelname_notification_show
    data:
      label: Motion Detected
      message: Example for a Notification on the Panel Screen
Climate control with Relays
[!WARNING] Although these instructions are still valid, since v4.0 there is a better way to setup a climate control using the panel’s relays and the add-on climate, which will continue to work even if Home Assistant and/or WiFi are not available. You probably only want to use this approach if you are not using the built-in thermometer.
In order to use the NSPanel to control a radiator or underfloor heating, at least one Generic Thermostat must be created in the HA. More information can be found here: https://www.home-assistant.io/integrations/generic_thermostat/
Example configuration Generic Thermostat:
climate:
  - platform: generic_thermostat
    name: Study
    heater: switch.study_heater ## Wenn das NSPanel Relays den Heizkreis Regler schaltet, kann dieses hier definiert werden
    target_sensor: sensor.study_temperature ## Hier kann der NSPanel Sensor verwendet werden
    min_temp: 15
    max_temp: 21
    ac_mode: false
    target_temp: 17
    cold_tolerance: 0.3
    hot_tolerance: 0
    min_cycle_duration:
      seconds: 5
    keep_alive:
      minutes: 3
    initial_hvac_mode: "off"
    away_temp: 16
    precision: 0.1
Afterwards, the climate.entity must be assigned accordingly in the panel configuration.
Call a Page Directly
In user-created automations within Home Assistant, there are scenarios where you might want to automatically display a specific page on your device’s screen. The following action enables this functionality:
Basic Pages
To open a specific page, you can utilize the esphome.xxxxxx_command action.
Here’s an example that demonstrates how to open the home page:
action: esphome.xxxxx_command
data:
  cmd: page home
Currently, the following pages can be accessed using this method:
buttonpage01buttonpage02buttonpage03buttonpage04entitypage01entitypage02entitypage03entitypage04homeqrcodescreensaverutilities
For instance, to directly navigate to button page 2, replace home in the command with buttonpage02:
action: esphome.xxxxx_command
data:
  cmd: page buttonpage02
[!NOTE] For more details about this action call, please refer to our API documentation.
Entity-Specific Pages
For entity-specific pages, a more detailed call is required as it involves specifying the entity.
You can use the action esphome.xxxxx_entity_details_show as shown in the following example:
action: esphome.xxxxx_entity_details_show
data:
  entity_id: climate.my_thermostat
  back_page: buttonpage01
[!NOTE] For more details about this action call, please refer to our API documentation.
Wake-up Page
You may have configured a specific Wake-up page on your device.
This page is automatically displayed after the device boots up or wakes up from sleep mode (such as the screensaver page).
To open this page, you have two options:
- Directly call the page if it is one of the Basic pages.
-
Use the
esphome.xxxxx_wake_upaction as follows:action: esphome.xxxxx_wake_up data: reset_timer: trueThe
reset_timerparameter allows you to control the Timeout sleep timer. Setting it totrueresets the timer, whilefalsecontinues counting down from the current value.
The Wake-up action differs from a normal page call in that it only opens the wake-up page if the panel is in sleep mode.
If the panel is already active, the current page remains displayed.
This feature is particularly useful in conjunction with a motion sensor to wake up your panel automatically.
By repeatedly calling this action whenever motion is detected, the panel can be either woken up or have its sleep timeout timer reset (if reset_timer is set to true).
[!NOTE] For more details about this action call, please refer to our API documentation.
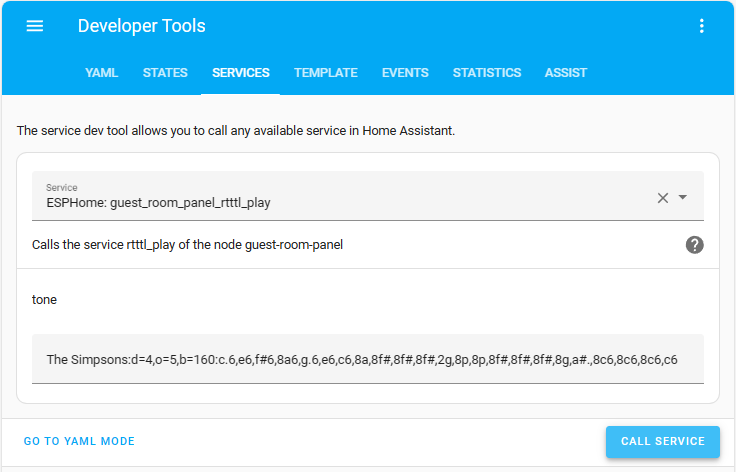
Play RTTTL Sound
HA can send a RTTTL to the NSPanel, custom melodies are possible.
To use this function, call the following action: rtttl_play
You can find many RTTTL strings on the web, the important thing is that they must start with the name and then a colon.
Here is an example:
The Simpsons:d=4,o=5,b=160:c.6,e6,f#6,8a6,g.6,e6,c6,8a,8f#,8f#,8f#,2g,8p,8p,8f#,8f#,8f#,8g,a#.,8c6,8c6,8c6,c6
More information: https://esphome.io/components/rtttl/#common-beeps
[!NOTE] For more details about this action call, please refer to our API documentation.
Start Automations via Input_Boolean
Although the NSPanel can execute scripts directly over the buttons, there is also the possibility of starting automations directly by the means of Input_Boolean.
For this, a helper must first be created under Settings –> Devices & services –> Helpers
Now add the created Input_Boolean as a trigger in the desired automation under State.
In the last step, assign the trigger to a button in the Panel Config.
Updating Wi-Fi settings and OTA Passwords in ESPHome with This Project
Overview
When you update your Wi-Fi password in a device with firmware from our project,
it’s important to remember that the wifi_password substitution is used for both Wi-Fi and OTA updates (and a few more places that are not relevant now).
Failing to update both simultaneously can lead to connection issues.
Step-by-Step Guide
- Prepare Your Device for Update
- Ensure your device is connected to your computer and is accessible via your current Wi-Fi network.
- Update OTA Password First
- Open your panel’s YAML.
-
Add the following in the customization area:
esphome: on_boot: - priority: 600 then: - lambda: |- id(ota_std).set_auth_password("Your new Wi-Fi password"); ota: - id: !extend ota_std password: "Your current Wi-Fi password" - Flash your device. It will use the current password for this flash and will inform your device to start using the new password for the next OTA.
- When your device starts, remove the lines above.
- Find the
wifi_ssidandwifi_passwordkey in thesubstitutionsarea (usually at the beginning of the file) and change it to your new Wi-Fi password. If that is point to!secret, you will have to edit it in yoursecrets.yamlfile instead. - Flash your device again with the updated YAML. It will use the current Wi-Fi to connect to your device and the new Wi-Fi password as the OTA password, then will inform your device to connect to the Wi-Fi with the new settings.
- Update Wi-Fi Settings in Your Access Point
Important Notes
- The device will still be using the old Wi-Fi settings for this update. If you’ve already changed your Wi-Fi network settings, this step will fail.
- Troubleshooting: Unable to Connect via Wi-Fi
- If your device cannot connect to Wi-Fi due to a password or SSID change, you will need to flash the device via a serial connection.
- Connect your device to your computer using a USB-to-Serial adapter.
- Use the ESPHome flasher tool to upload the new configuration.
- In this case, don’t worry about the OTA password, as it’s not required when flashing via serial.
Verify the Update
- Once the new configuration is uploaded, your device should automatically connect to your Wi-Fi network with the new settings.
- Verify that OTA updates are working with the new password.
Additional Tips
- Backup Your Configuration: Always keep a backup of your ESPHome configuration files.
- Network Accessibility: Ensure your device remains within your Wi-Fi network’s range during the update process.
- Serial Flashing: Familiarize yourself with the process of flashing via serial, as it’s a reliable fallback method.
Conclusion
By carefully updating both your Wi-Fi settings and OTA passwords in your ESPHome configuration, you can avoid connection issues. Remember to always back up your configuration and be prepared to use a serial connection if Wi-Fi connectivity is lost.