NSPanel-Easy
API
This document provides details on custom actions designed for integration with Home Assistant, including their usage, parameters, and examples.
Summary
- Action Documentation
- Button Action (
button): Configures properties and state of buttons on a specified button page. - Command Action (
command) - DEPRECATED: Sends a custom command directly to the display. - Component Color Action (
component_color): Changes the foreground color of a specified component on the display. - Component Text List Action (
component_text_list): Updates the text of a specified component on the display using a list of values. - Component Value Action (
component_val): Updates the value of a specified component on the display. - Components Visibility Action (
components_visibility): Hides or shows a specified component on the display. - Entity Details Show Action (
entity_details_show): Displays detailed information for a specific entity. - Hardware Button State Indication Action (
hw_button_state): Updates the visual state (on/off) of the left and right hardware button indicators on the panel. - Icon Action (
icon): Updates a chip or custom button’s icon, color, and visibility. - Notification Clear Action (
notification_clear): Clears the current notification from the screen. - Notification Show Action (
notification_show): Displays a notification-message on the screen. - QR Code Action (
qrcode): Displays a QR code on the panel or updates the QR code information for local control. - RTTTL Play Action (
rtttl_play): Plays melodies encoded in the RTTTL format. - Upload TFT Action (
upload_tft): Enables TFT file updates from a URL, requiring the “Upload TFT” add-on. - Utilities Group Refresh Action (
utilities_group_refresh): Updates utility group display values and direction indicators. - Value Action (
value): Updates an entity to display specific values. - Wake Up Action (
wake_up): Activates the display from a screensaver or low-brightness state. - Alarm Settings Page Action (
page_alarm): Updates the Alarm page with current state information. - Climate Page Action (
page_climate): Updates the Climate page with current state information. - Media Player Page Action (
page_media_player): Updates the Media Player page with current state information.
- Button Action (
- Screen Components
Action Documentation
General Guidance
In general, there’s no validation of parameters in an action call. Please validate inputs on the caller side; otherwise this can crash the ESPHome side and likely restart the panel.
One example is colors. In almost all cases, an array of three unsigned integers between 0 and 255 is expected. If you send anything different, the conversion to the RGB565 used by Nextion will crash.
Action naming and <your_panel_name>
All examples use esphome.<your_panel_name>_<action> as a placeholder.
The actual action name in Home Assistant is derived from your ESPHome device name, slugified (lowercase, spaces replaced with underscores).
How the name is derived depends on the Home Assistant version that discovered the device:
- Newer Home Assistant versions use the
friendly_namesubstitution (e.g.,friendly_name: "Living Room Panel"→living_room_panel). - Older Home Assistant versions used the
namesubstitution instead (e.g.,name: "livingroompanel"→livingroompanel).
You can look up the action names available on your Home Assistant instance under Settings > Developer tools > Actions, then search for your panel name.
Table of Contents
| Action ID | Action Name | Description |
| ——— | ———– | ———– |
| button | Button Action | Configures properties and state of buttons on a specified button page. |
| command | Command Action | Sends a custom command directly to the display. |
| component_color | Component Color Action | Changes the foreground color of a specified component on the display. |
| component_text_list | Component Text List Action | Updates the text of a specified component on the display using a list of values. |
| component_val | Component Value Action | Updates the value of a specified component on the display. |
| components_visibility | Components Visibility Action | Hides or shows a specified component on the display. |
| entity_details_show | Entity Details Show Action | Displays detailed information for a specific entity. |
| hw_button_state | Hardware Button State Indication Action | Updates the visual state (on/off) of the left and right hardware button indicators on the panel. |
| icon | Icon Action | Updates a chip or custom button’s icon, color, and visibility. |
| notification_clear | Notification Clear Action | Clears the current notification from the screen. |
| notification_show | Notification Show Action | Displays a notification-message on the screen. |
| page_alarm | Alarm Settings Page Action | Updates the Alarm page with current state information. |
| page_climate | Climate Page Action | Updates the Climate page with current state information. |
| page_media_player | Media Player Page Action | Updates the Media Player page with current state information. |
| qrcode | QR Code Action | Displays a QR code on the panel or updates the QR code information for local control. |
| rtttl_play | RTTTL Play Action | Plays melodies encoded in the RTTTL format. |
| upload_tft | Upload TFT Action | Enables TFT file updates from a URL, requiring the “Upload TFT” add-on. |
| utilities_group_refresh | Utilities Group Refresh Action | Updates utility group display values and direction indicators. |
| value | Value Action | Updates an entity to display specific values. |
| wake_up | Wake Up Action | Activates the display from a screensaver or low-brightness state. |
Button Action: button
Configures the properties and state of buttons on a specified button page, allowing for dynamic updates to button appearance and behavior based on specified parameters.
Usage: This action is designed for dynamic user interface adjustments, enabling the customization of button states, icons, colors, and labels. It’s particularly useful for reflecting changes in device states or user interactions within the UI.
Parameters:
page(string): The page identifier where the button is located.id(string): The button’s unique identifier.state(bool): The state of the button, which can affect its background picture and other visual elements.icon(string): Icon codepoint from HASwitchPlate Material Design Icons. Example: “\uE6E8” formdi:lightbulb-on-outline.icon_color(int[]): The RGB color array for the icon.icon_font(int): The Nextion font identifier for the icon (default is 8).bri(string): Brightness level or other dynamic information to display on the button close to the icon.label(string): The main text label displayed on the button.is_page_render(bool): Whentrue, skips the background picture (picc) update for buttons in the off state, as the button page Preinitialize event already set the correct background during page load. Set tofalse(default) for individual button state updates triggered by entity state changes.
Home Assistant Example:
action: esphome.<your_panel_name>_button
data:
  page: "buttonpage01"
  id: "button08"
  state: true
  icon: "\uE6E8"           # Example for mdi:lightbulb-on-outline
  icon_color: [255, 0, 0]  # Red
  icon_font: 2
  bri: "75%"
  label: "Living Room"
  is_page_render: false    # Set to true when called from a full page render
[!NOTE] Replace
<your_panel_name>with the slugified name of your panel (see Action naming). This action dynamically updates the specified button’s properties to match the provided parameters.
Command Action: command
[!IMPORTANT] This command is deprecated and will be removed soon.
Sends a custom command directly to the display, enabling direct interaction and dynamic content updates.
Usage: This action is particularly useful for advanced customizations and direct display manipulations, such as showing messages, updating statuses, or any other display-centric commands.
Parameters:
cmd(string): The command string to be sent to the display. Please refer to The Nextion Instruction Set for a comprehensive list of commands supported.
Home Assistant Example:
action: esphome.<your_panel_name>_command
data:
  cmd: "page home"  # Go to page "Home"
[!NOTE] Replace
<your_panel_name>with the slugified name of your panel (see Action naming).Ensure the command string (
cmd) is properly formatted according to your display’s command processing capabilities.
Component Color Action: component_color
Changes the foreground color of a specified component on the display, enabling dynamic color updates for user interface customization.
Usage: This action is ideal for creating visually dynamic interfaces, allowing elements to change color based on conditions, events, or user actions, such as indicating status changes or highlighting specific UI components.
Parameters:
page(string): Identifier of the page where the component is. Usememwhen setting memory vars or leave empty for current page or global vars.id(string): Identifier of the component whose color will be updated. It is essential that this matches the component’s ID in your display layout to ensure the correct element is targeted.color(int[]): The new color for the component, specified as an RGB array (e.g.,[255, 0, 0]for red).
[!IMPORTANT] Using
page: memfor Memory VariablesThe base implementation of
component_coloraction does not include handling forpage: mem. This is by design to support a modular architecture.To use
page: mem, you must ensure that the appropriate extension file is included in your configuration. These extension files use ESPHome’s!extendfeature to addpage == "mem"handling for their specific memory variables. For example:
nspanel_esphome_version.yamlextends these actions to handle version-related memory variablesnspanel_esphome_page_utilities.yamlextends these actions for utilities-specific memory variables- Other component files may add their own
memhandlersBefore using
page: memin your automations:
- Verify that your ESPHome configuration includes the extension file that handles the specific memory variable you want to update
- Check the component’s documentation to confirm which memory variables are supported
- If
page: memdoesn’t work as expected, ensure the required extension package is loaded in your configurationWhen an extension is not present, using
page: memwill have no effect, and the action may be silently ignored.
Home Assistant Example:
action: esphome.<your_panel_name>_component_color
data:
  page: home
  id: time
  color: [255, 0, 0]  # Changes the component's color to red
[!NOTE] Replace
<your_panel_name>with the slugified name of your panel (see Action naming).Ensure the
idand color parameters accurately target and define the new color for the component.
Component Text List Action: component_text_list
Updates the text of a specified component on the display using a list of values, enabling dynamic text content updates.
Replaces the former component_text action. Single-value callers should pass a one-element list.
Usage:
Ideal for user interfaces that require real-time text updates, such as status messages, labels, or any text-based information display.
Also used by page modules that store list-shaped data in memory (e.g. the options list for the popup_select picker page).
Parameters:
page(string): Identifier of the page where the component is. Usememwhen setting memory vars or leave empty for current page or global vars.id(string): Identifier of the component whose text will be updated. Ensure this matches the component’s ID in your display layout.txt_list(string[]): List of text values. For Nextion-targeted pages, only the last element of the list is applied (earlier elements are discarded since each write to the same component would be immediately overwritten). Forpage: memtargets handled by list-aware extensions, the full list is passed through.
[!IMPORTANT] Using
page: memfor Memory VariablesThe base implementation of
component_text_listaction does not include handling forpage: mem. This is by design to support a modular architecture.To use
page: mem, you must ensure that the appropriate extension file is included in your configuration. These extension files use ESPHome’s!extendfeature to addpage == "mem"handling for their specific memory variables. For example:
nspanel_esphome_version.yamlextends these actions to handle version-related memory variablesnspanel_esphome_page_utilities.yamlextends these actions for utilities-specific memory variables- Other component files may add their own
memhandlersBefore using
page: memin your automations:
- Verify that your ESPHome configuration includes the extension file that handles the specific memory variable you want to update
- Check the component’s documentation to confirm which memory variables are supported
- If
page: memdoesn’t work as expected, ensure the required extension package is loaded in your configurationWhen an extension is not present, using
page: memwill have no effect, and the action may be silently ignored.
Home Assistant Example (single value, typical migration from component_text):
action: esphome.<your_panel_name>_component_text_list
data:
  page: home
  id: time
  txt_list:
    - "12:34"
Home Assistant Example (list of values, for list-aware memory namespaces):
action: esphome.<your_panel_name>_component_text_list
data:
  page: mem
  id: popup_select_options
  txt_list:
    - "None"
    - "Rainbow"
    - "Pulse"
    - "Twinkle"
[!NOTE] Replace
<your_panel_name>with the slugified name of your panel (see Action naming).Make sure the
idcorresponds to the correct component on your display (or the correct memory namespace key) for the text update to work as intended.
Component Value Action: component_val
Updates the value of a specified component on the display, enabling dynamic value updates.
Usage: Ideal for interfaces requiring real-time updates of numerical values, such as counters, temperature readings, or any numeric indicators.
Parameters:
page(string): Identifier of the page where the component is. Usememwhen setting memory vars or leave empty for current page or global vars.id(string): Identifier of the component whose value will be updated. It’s crucial this matches the component’s ID in your display layout accurately.val(int): The new integer value to be set for the component. This can represent various data types, depending on the component’s purpose (e.g., temperature, humidity levels).
[!IMPORTANT] Using
page: memfor Memory VariablesThe base implementation of
component_valaction does not include handling forpage: mem. This is by design to support a modular architecture.To use
page: mem, you must ensure that the appropriate extension file is included in your configuration. These extension files use ESPHome’s!extendfeature to addpage == "mem"handling for their specific memory variables. For example:
nspanel_esphome_version.yamlextends these actions to handle version-related memory variablesnspanel_esphome_page_utilities.yamlextends these actions for utilities-specific memory variables- Other component files may add their own
memhandlersBefore using
page: memin your automations:
- Verify that your ESPHome configuration includes the extension file that handles the specific memory variable you want to update
- Check the component’s documentation to confirm which memory variables are supported
- If
page: memdoesn’t work as expected, ensure the required extension package is loaded in your configurationWhen an extension is not present, using
page: memwill have no effect, and the action may be silently ignored.
Home Assistant Example:
action: esphome.<your_panel_name>_component_val
data:
  page: cover
  id: coverslider
  val: 25
[!NOTE] Replace
<your_panel_name>with the slugified name of your panel (see Action naming).Ensure the
idaccurately matches the component on your display to successfully update its value.
Components Visibility Action: components_visibility
Hides or shows a list of components on the display, allowing for dynamic interface changes.
Usage: This action is ideal for creating interactive user interfaces that adapt by hiding or showing certain elements based on user actions, conditions, or events.
Parameters:
page(string): Identifier of the page where the component is. Usememwhen setting memory vars or leave empty for current page or global vars.ids(string[]): Array of identifiers of the components to be hidden/shown. It is crucial that this matches the component’s ID in your display layout to ensure the correct element is hidden/shown.visible(bool): Set to true to show the component, or false to hide it.
Home Assistant Example:
action: esphome.<your_panel_name>_components_visibility
data:
  page: home
  ids: [ "date", "time" ]  # Hides the date and time display on Home page
  visible: false
[!NOTE] Replace
<your_panel_name>with the slugified name of your panel (see Action naming).Ensure the ids match the components on your display you wish to hide or show.
[!IMPORTANT] This command only works when the target page is visible.
If a component being hidden/shown is not part of the current page, the command will fail and an error message will be logged.
Entity Details Show Action: entity_details_show
This action is designed to display detailed information about a specific entity within the panel’s interface. It enables users to navigate to a dedicated page showing extensive details about an entity, such as a light or a climate, and provides a structured way to return to either the home page or a specific button page.
Usage:
Ideal for interfaces requiring detailed entity information across various contexts.
By specifying the entity and back_page, users are offered a seamless navigation experience,
ensuring they can easily access detailed information and return to their initial navigation point within the interface.
Parameters:
entity(string): The unique identifier of the entity (entity_idin Home Assistant) for which details are displayed. The domain is used to select the corresponding detail page. Supported domains are:alarm_control_panelbuttonclimatecoverfaninput_booleaninput_buttonlightmedia_playerswitchwater_heater
Use the special value
embedded_climateto open the built-in climate control page for the panel’s relay-based thermostat.back_page(string): The page identifier to return to after viewing entity details. Valid options arehomefor the home page orbuttonpage01tobuttonpage04for button pages. No other pages are supported to maintain navigation consistency.
Home Assistant Example:
action: esphome.<your_panel_name>_entity_details_show
data:
  entity: "light.living_room"
  back_page: "buttonpage01"
[!NOTE] Replace
<your_panel_name>with the slugified name of your panel (see Action naming). This setup provides a direct and user-friendly way to access and return from detailed entity information, enhancing the interface’s usability.
Hardware Button State Indication Action: hw_button_state
This action dynamically updates the on-screen indication bars for the hardware buttons, reflecting the current state of the entities they control. It’s designed to provide immediate visual feedback, enhancing the user interface by showing the active/inactive state of the left and right hardware button indicators on the panel.
Usage: Utilize this action to modify the visual state (on/off) of hardware button indicators on the panel, corresponding to the state of entities controlled by these buttons. This allows for visual feedback that matches the operational state of the buttons.
Parameters:
button_mask(int): A bitwise identifier for buttons. Use1for the left button,2for the right button, and3for both buttons.state(bool): The state to apply to the button(s) indicated bybutton_mask. True for on (active), false for off (inactive).
Home Assistant Example:
action: esphome.<your_panel_name>_hw_button_state
data:
  button_mask: 3  # Targets both the left (1) and right (2) buttons
  state: true     # Turns the indication bars on for both buttons
[!NOTE] Replace
<your_panel_name>with the slugified name of your panel (see Action naming). This action leverages a bitmask (button_mask) for flexible control over multiple hardware buttons simultaneously, offering a streamlined method for updating their visual states.
Icon Action: icon
Updates a chip or custom button’s icon, color, and visibility within Home Assistant.
Usage: This action is ideal for dynamically updating icons on your Panel, allowing for a customizable and interactive user interface.
Parameters:
page(string): Usechipsfor chip components or use the page name for other components.id(string): Identifier of the chip or button component. Refer to “Screen components” for more details.icon(string): Icon codepoint from HASwitchPlate Material Design Icons. Example: “\uE6E8” formdi:lightbulb-on-outline.icon_color(int[]): RGB color array for the icon. Example:[0, 255, 0]for green.visible(bool): Flag indicating whether the icon should be visible (true) or hidden (false).
Home Assistant Example:
action: esphome.<your_panel_name>_icon
data:
  page: chips
  id: chip03
  icon: "\uE6E8"           # Example for mdi:lightbulb-on-outline
  icon_color: [0, 255, 0]  # Green
  visible: true
[!NOTE] Replace
<your_panel_name>with the slugified name of your panel (see Action naming).
Notification Clear Action: notification_clear
Removes any displayed notification from the screen, allowing the display to return to its normal state or view.
Usage: This action is essential after displaying notifications or alerts. It ensures the user interface remains clean and uncluttered by clearing messages once they are no longer needed or have been acknowledged.
Home Assistant Example:
action: esphome.<your_panel_name>_notification_clear
[!NOTE] Replace
<your_panel_name>with the slugified name of your panel (see Action naming). This simple action clears the current notification from the display, maintaining a tidy interface.
Notification Show Action: notification_show
Displays a notification message on the screen, enabling dynamic presentation of information or alerts.
Usage: Designed for scenarios requiring immediate feedback or notification on the display, this action is suitable for showing alerts, informational messages, or updates directly on the screen interface.
Parameters:
label(string): A brief title or label for the notification, typically displayed in a prominent, bold format.message(string): The detailed message or content of the notification, providing the main information or alert to the user. The system will automatically wrap text to fit the display unless\ris used to insert manual line breaks. When\ris present, the system respects only the line breaks provided by the user, enhancing message formatting control.
Home Assistant Example:
action: esphome.<your_panel_name>_notification_show
data:
  label: "Security Alert"
  message: "Front door opened at 10:30 PM\rPlease check the entrance."
[!NOTE] Replace
<your_panel_name>with the slugified name of your panel (see Action naming). This ensures the action executes correctly, displaying the notification with the specifiedlabelandmessage.Utilize
\rwithin the message for custom line breaks, offering precise formatting control.
Alarm Settings Page Action: page_alarm
Populates the alarm settings page with the current configuration and state information, seamlessly integrating with the panel’s interface to reflect the latest settings and statuses of the alarm system.
Usage:
The page_alarm action is specifically designed to dynamically update the alarm settings page,
providing users with immediate access to the alarm system’s controls and information.
It plays a crucial role in ensuring a responsive and user-friendly interface for alarm management,
allowing for real-time interaction with the alarm system directly from the panel.
Parameters:
state(string): The current state of the alarm system, such as “armed_home” or “disarmed”.supported_features(int): A bitmask indicating the features supported by the alarm system. This determines the controls and options available on the alarm settings page. The bitmask values are aligned with the Home Assistant Alarm Control Panel Supported Features.code_format(string): Specifies the code format required for arming/disarming the alarm system, such as numeric or alphanumeric.code_arm_required(bool): Indicates whether a code is required to arm the system.entity(string): The entity ID of the alarm system, used for state updates and control actions.
Home Assistant Example:
action: esphome.<your_panel_name>_page_alarm
data:
  state: "disarmed"
  supported_features: 31  # Example: Supports arm/disarm, home/away modes, etc.
  code_format: "number"
  code_arm_required: true
  entity: "alarm_control_panel.home_alarm"
[!NOTE] Replace
<your_panel_name>with the slugified name of your panel (see Action naming). This action configuration allows for the alarm settings page to dynamically reflect the current features, state, and control options of your alarm system, enhancing the overall user experience.
Supported features of the alarm control panel entity
- ARM_HOME = 1
- ARM_AWAY = 2
- ARM_NIGHT = 4
- TRIGGER = 8
- ARM_CUSTOM_BYPASS = 16
- ARM_VACATION = 32
Climate Page Action: page_climate
Updates the climate page with the current state information, seamlessly integrating with the panel’s interface to display the latest climate settings and statuses.
Usage: Designed to dynamically update the climate page, this action ensures users have instant access to climate control settings and information. It’s crucial for maintaining a responsive and informative interface for efficient climate management.
Parameters:
current_temp(float): The current temperature.supported_features(int): Bitmask indicating the climate device’s supported features. These features determine the available climate controls and settings on the device. The bitmask values correspond to features such as temperature control, mode setting, fan speed adjustment, etc., as defined in Home Assistant’s climate component constants. For detailed descriptions of each feature and its corresponding bitmask value, refer to the Home Assistant Climate Component Constants.target_temp(float): The set target temperature.target_temp_high(float): The high end of the target temperature range, for devices that support temperature ranges.target_temp_low(float): The low end of the target temperature range.temp_step(int): The minimum temperature granularity (step size) supported by the device when setting a new temperature, encoded as the step in degrees (Celsius or Fahrenheit) multiplied by 10 and rounded to the nearest integer. This value is used to scale the temperature selector on the display. For example, a 0.5°C step is sent as5, while a 1.0°C step is sent as10.total_steps(int): Total number of steps for temperature adjustment, calculated as ((temp_max - temp_min) / temp_step).temp_offset(int): Offset applied to the temperature reading for calibration.climate_icon(string): Icon representing the current climate status, selected from HASwitchPlate Material Design Icons.entity(string): Entity ID for the climate device. Use the special value “embedded_climate” to control the panel’s built-in climate add-on.
Home Assistant Example:
action: esphome.<your_panel_name>_page_climate
data:
  current_temp: 22.5
  supported_features: 5      # Example bitmask: 1 (temp control) + 4 (fan mode)
  target_temp: 24.0
  target_temp_high: 25.0
  target_temp_low: 19.0
  temp_step: 5               # Adjust in 0.5°C increments (if your firmware uses 0.5°C steps)
  total_steps: 56            # Calculated based on the device's temperature range and step.
  temp_offset: 70            # Applied as a calibration offset.
  climate_icon: "\uE392"     # mdi:thermostat
  entity: "climate.living_room"
[!NOTE] Replace
<your_panel_name>with the slugified name of your panel (see Action naming). This action ensures the climate page reflects the latest in climate control settings, enhancing the user experience by providing up-to-date information.
Supported features of the climate entity
- TARGET_TEMPERATURE = 1
- TARGET_TEMPERATURE_RANGE = 2
- TARGET_HUMIDITY = 4
- FAN_MODE = 8
- PRESET_MODE = 16
- SWING_MODE = 32
- AUX_HEAT = 64
- TURN_OFF = 128
- TURN_ON = 256
Media Player Page Action: page_media_player
Updates the media player page with current configuration and state information, integrating seamlessly with the panel’s interface to display the latest media playback status and controls.
Usage:
The page_media_player action is specifically tailored to dynamically update the media player page,
ensuring users have immediate access to media playback controls and information.
This action is essential for providing a responsive and user-friendly interface for media management,
allowing real-time interaction with the media player directly from the panel.
Parameters:
entity(string): The entity ID of the media player.state(string): The current state of the media player (e.g., playing, paused, stopped).is_volume_muted(bool): Indicates whether the volume is currently muted.volume_level(int): The current volume level of the media player.media_title(string): The title of the currently playing media.media_artist(string): The artist of the currently playing media.media_duration(float): The total duration of the currently playing media in seconds.media_position(float): The current playback position within the media in seconds.media_position_delta(float): The amount of time in seconds since the last update of the media position.supported_features(int): A bitmask indicating the features supported by the media player, such as play/pause, next/previous track, volume control, etc. The bitmask values correspond to the Home Assistant Media Player Supported Features.
Home Assistant Example:
action: esphome.<your_panel_name>_page_media_player
data:
  entity: "media_player.living_room"
  state: "playing"
  is_volume_muted: false
  volume_level: 40
  media_title: "Favorite Song"
  media_artist: "Famous Artist"
  media_duration: 180
  media_position: 30
  media_position_delta: 0.5
  supported_features: 84  # Example: Play, Pause, Next, Previous
[!NOTE] Replace
<your_panel_name>with the slugified name of your panel (see Action naming). This action ensures the media player page reflects the latest in media playback settings and status, enhancing the user experience by providing up-to-date information.
Supported features of the media player entity
- PAUSE = 1
- SEEK = 2
- VOLUME_SET = 4
- VOLUME_MUTE = 8
- PREVIOUS_TRACK = 16
-
NEXT_TRACK = 32
- TURN_ON = 128
- TURN_OFF = 256
- PLAY_MEDIA = 512
- VOLUME_STEP = 1024
- SELECT_SOURCE = 2048
- STOP = 4096
- CLEAR_PLAYLIST = 8192
- PLAY = 16384
- SHUFFLE_SET = 32768
- SELECT_SOUND_MODE = 65536
- BROWSE_MEDIA = 131072
- REPEAT_SET = 262144
- GROUPING = 524288
- MEDIA_ANNOUNCE = 1048576
- MEDIA_ENQUEUE = 2097152
QR Code Action: qrcode
Displays a QR code on the display, which can be used for various purposes such as sharing a WiFi password or linking to a website.
Usage: This action enables the dynamic display of QR codes on a specified page of the ESPHome user interface, allowing for the convenient sharing of information. It’s particularly useful for settings where quick, scannable access to data is beneficial.
Parameters:
title(string): The title or heading to display above the QR code, providing context or instructions.qrcode(string): The actual data or URL to be encoded into the QR code.show(bool): A flag that determines whether to immediately display the QR code page upon calling the action.
Home Assistant Example:
action: esphome.<your_panel_name>_qrcode
data:
  title: "Wi-Fi Access"
  qrcode: "WIFI:T:WPA;S:mynetwork;P:mypass;;"
  show: true
[!NOTE] Replace
<your_panel_name>with the slugified name of your panel (see Action naming). This action will generate and display the QR code based on the provided data, navigating to the QR code page ifshowis set totrue.
[!NOTE] This action is typically invoked during initialization to preload QR Code information based on blueprint settings, ensuring the data is accessible on the panel even without Wi-Fi connectivity. To update the QR Code information without immediately displaying it, call this action with
show: false. This allows for seamless updates to the QR Code content without disrupting the current user interface.
RTTTL Play Action: rtttl_play
Plays melodies encoded in the RTTTL format, enabling the integration of audio feedback or alerts with simple text-based melody strings.
Usage: This action is perfect for projects requiring audio signals, such as notifications, alerts, or simple melodies, by interpreting RTTTL (Ring Tone Text Transfer Language) strings. RTTTL is a compact format for storing melody sequences in a text-based format, making it ideal for simple audio devices like buzzers.
Parameters:
tone(string): The RTTTL string representing the melody to be played. This string must conform to the RTTTL format, which includes the melody’s name, default settings, and a sequence of notes.
Example Tones: For example tones and further inspiration, you can visit this list with examples of RTTTL songs.
Home Assistant Example:
action: esphome.<your_panel_name>_rtttl_play
data:
  tone: "The Simpsons:d=4,o=5,b=160:c.6,e6,f#6,8a6,g.6,e6,c6,8a,8f#,8f#,8f#,2g,8p,8p,8f#,8f#,8f#,8g,a#.,8c6,8c6,8c6,c6"
[!NOTE] Replace
<your_panel_name>with the slugified name of your panel (see Action naming).Ensure the
toneparameter contains a valid RTTTL string to successfully play the melody.
TFT File Update Action: upload_tft
Enables the remote update of the panel’s TFT file from a specified URL or a default location, available exclusively with the “Upload TFT” add-on installed. This action is valuable for downloading alternative TFT files for customization or addressing file access issues.
Usage: This action is crucial for dynamically updating the TFT file, facilitating seamless transitions between different configurations or updates. It’s particularly useful for applying custom interface designs or updates when direct access to the repository is limited.
Parameters:
url(string): The URL for downloading the TFT file. If set to “default”, it utilizes the URL from the “Update TFT - Display Model” selection in Home Assistant (Settings > Devices & Actions > ESPHome).
Home Assistant Example:
action: esphome.<your_panel_name>_upload_tft
data:
  url: "http://homeassistant.local:8123/local/custom_tft_file.tft"  # URL to the new TFT file
[!NOTE] Replace
<your_panel_name>with the slugified name of your panel (see Action naming). Using “default” fetches the URL associated with the selected display model in Home Assistant settings, simplifying updates or customizations.
[!WARNING] The “Upload TFT” add-on must be installed for this action to be available, enhancing the panel’s flexibility for interface customization or troubleshooting.
Utilities Group Refresh Action: utilities_group_refresh
Updates utility group display values and direction indicators on the panel. This action is used to refresh the displayed values for utility groups dynamically.
Usage: This action is particularly useful for updating display elements associated with utility groups, such as values and directional indicators, based on specified parameters.
Parameters:
group_id(string): The unique identifier for the utility group.value1(string): The first value to be displayed for the group.value2(string): The second value to be displayed for the group.direction(int): The direction indicator value for the group.constructor(bool): A flag to indicate if this is a constructor call, which forces updates regardless of current values.
Home Assistant Example:
action: esphome.<your_panel_name>_utilities_group_refresh
data:
  group_id: "home"
  value1: "100 kWh"
  value2: "26 °C"
  direction: 1
  constructor: false
[!NOTE] Replace
<your_panel_name>with the slugified name of your panel (see Action naming).
This action updates utility group display elements with the specified values and direction indicators dynamically.
Value Action: value
Updates an entity to display specific values, allowing for dynamic updates of icons, names, and value colors within Home Assistant.
Usage: This action is intended for entities that need to display information dynamically, such as sensor readings or state values, with customized icons, names, and color coding for both icon and value.
Parameters:
id(string): Identifier of the entity being updated. For details on entity identifiers, refer to “Screen components”.icon(string): Icon codepoint from HASwitchPlate Material Design Icons. Indicates the icon displayed next to the value.icon_color(int[]): RGB color array for the icon, allowing for custom icon colors.name(string): The display name for the entity, useful for labeling the value displayed.value(string): The actual value to be displayed next to the icon and name.value_color(int[]): RGB color array for the value text, enabling custom coloring of the displayed value.
Home Assistant Example:
action: esphome.<your_panel_name>_value
data:
  id: "sensor.temperature"
  icon: "\uE6E8"           # Example for mdi:thermometer
  icon_color: [255, 0, 0]  # Red
  name: "Temperature"
  value: "75°F"
  value_color: [255, 255, 0] # Yellow
[!NOTE] Replace
<your_panel_name>with the slugified name of your panel (see Action naming).
Wake Up Action: wake_up
Activates the display from a screensaver or low-power state, enabling dynamic interface adjustments based on user interactions or automated triggers.
Usage: Ideal for scenarios requiring the display to become active upon certain events, such as motion detection, thereby conserving energy while ensuring the display is available when needed.
Parameters:
reset_timer(bool): Determines whether to reset the sleep and dimming timers upon waking up the display. Setting this totrueensures the display remains active during user presence, whilefalseretains the existing timer durations.
Home Assistant Example:
action: esphome.<your_panel_name>_wake_up
data:
  reset_timer: true
[!NOTE] Replace
<your_panel_name>with the slugified name of your panel (see Action naming). This ensures the action executes correctly, waking the display and optionally resetting timers based on thereset_timerparameter.
Practical Use Case: Motion Sensor Activation:
This action can be seamlessly integrated with a motion sensor to wake the display when motion is detected, making it instantly usable.
Additionally, if the display is already awake, calling this action with reset_timer: true can reset the sleep timer,
keeping the display active as long as there is movement and allowing it to sleep normally once no motion is detected.
The example below integrates the wake_up action with a motion sensor to ensure the display wakes or remains awake during periods of activity,
reverting to sleep mode after inactivity.
automation:
  - alias: "Wake Display on Motion"
    trigger:
      - platform: state
        entity_id: binary_sensor.motion_sensor_123
        to: 'on'
    action:
      - action: esphome.<your_panel_name>_wake_up
        data:
          reset_timer: true
    mode: restart
[!NOTE] Adjust
<your_panel_name>andbinary_sensor.motion_sensor_123to your actual panel and sensor entity IDs. This setup ensures the display is responsive to environmental conditions, enhancing user interaction while managing energy consumption efficiently.
Screen components
Chips
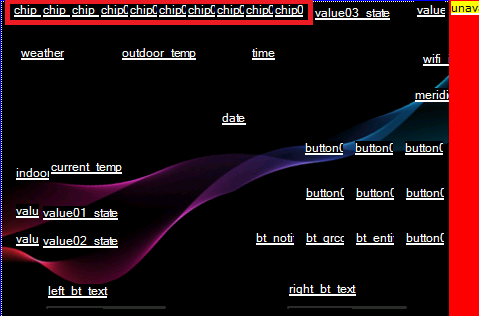
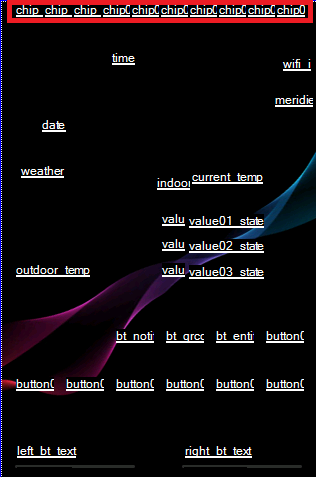
User-defined Chips
- Description: Chips are status indicator icons shown on the home page and screensaver. Their behaviour is controlled by the blueprint.
- Availability: Rendered on home page and screensaver. Use
page: chipsin theiconaction to update them from any page context. - Ids:
chip01tochip07.
Relays Chips
- Description: Icons representing each of the relay states.
- Availability: Rendered on home page and screensaver.
- Ids:
chip_relay1andchip_relay2.
Climate Chip
- Description: Icon representing the state of the main climate entity.
- Availability: Rendered on home page and screensaver.
- Ids:
chip_climate.
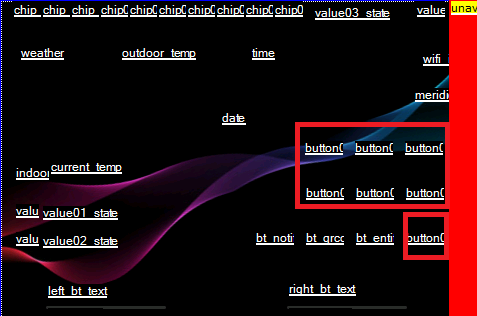
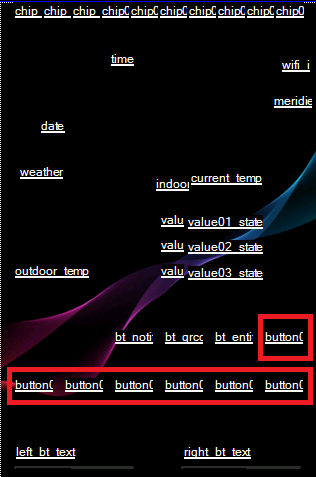
Home Page - Custom buttons
Home Page - Values
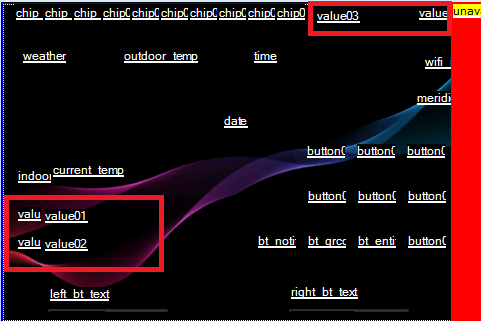
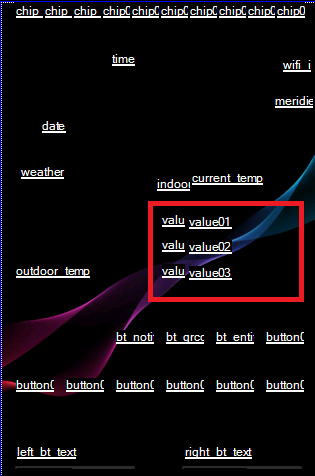 This is a multi-component system, with names
 value01 to value03 containing the state of the entity,
where value01_icon to value03_icon supports the icons.
Entities Pages - Values
Just like in “Home Page - Values”, this is a multi-component system, with names value01 to value08 containing the state of the entity,
where value01_icon to value08_icon supports the icons and, exclusively in the Entities pages, value01_label to value08_label,
which will contain the friendly name or some alternative label for the entities.
Each of these sets are sent using the Value Action (value), with up to 8 individual calls to this action for each page construction.